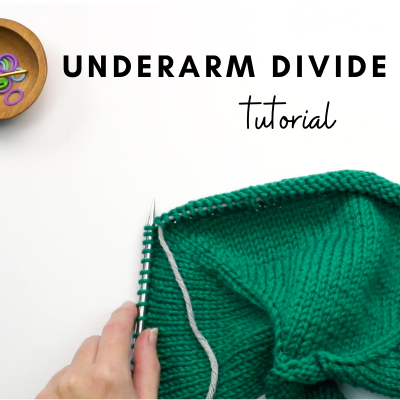
Because so many of my patterns are top-down raglans, I thought it would be beneficial to do a step-by-step tutorial for how to do the underarm divide. The underarm divide occurs when you have completed the raglan increases and it’s time to separate the sleeves and join the back and front pieces of the garment together. It can seem confusing the first time you do it, so hopefully the photo instructions below will help.
Additionally, I have updated this blog post in 2020 to include a video! Below is a video tutorial of working the underarm divide in my Audrey’s Cardigan pattern. Although my instructions are specific to this cardigan, the techniques I use are relevant to any other top-down raglan pattern:
My Original Photo tutorial:
Using my pattern “Crocus” as an example, let’s go step by step through the “Underarm Divide Row” section:
1) Direction: (RS)*k to marker, remove marker, k2, remove marker, using tapestry needle threaded with piece of scrap yarn, transfer sleeve sts onto scrap yarn…
So the first step is to knit as described to marker, then simply remove the marker knit 2, and then remove the next marker. I then put the work down, find some misc. scrap yarn and cut a piece around 20″ length. I thread it through a tapestry needle. Picking the work back up, I transfer each sleeve stitch (the series of stitches that are before the next marker) onto the scrap yarn. See pictures below:
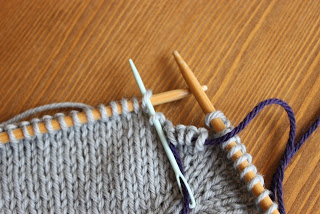
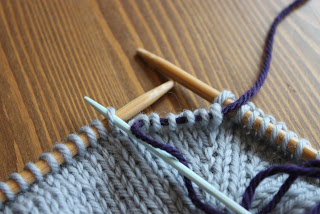
This holds the “live” sleeve stitches until the body is done. Once the body is done, these “live” stitches are transferred to DPNs or a size 16″ circular needle and knit in the round to the cuff. Since we keep these sleeve stitches “live” it prevents any kind of seaming.
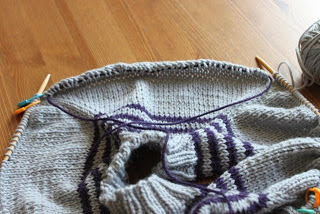
This next picture shows what it looks like when step 1 is complete and all sleeve stitches have been transferred to the piece of scrap yarn:
2) Direction: …turn work over & using the knitted cast-on method, CO 6 (8, 14, 18, 24) sts…
Step 2 is where it gets just a little tricky. Once the sleeve stitches are separated from the body (by putting the stitches on scrap yarn), a lot of top-down raglan patterns (including this one) instruct you to cast-on some underarm stitches. There are a couple of reasons for this:
- Once the raglan armhole depth has been reached, you may not have reached your desired bust measurement. So in order to make sure you get that desired bust measurement, you cast on additional stitches at the underarm
- Having stitches at the underarm gives additional room so that your arms can really move around.
When the directions say to “turn work over”, you do just that – turn it so the WS is facing you and the needle with the working yarn that was in your right hand will now be in your left hand. Some patterns may say “flip work” at this step instead of “turn work over” – it means the same thing.
Once you’ve done “the turn” you can now cast-on stitches using the knitted-on cast-on method (or some patterns use the cable cast-on method). This method of casting on allows you to cast-on stitches in the middle of your work which makes it a perfect technique for casting on underarm stitches.
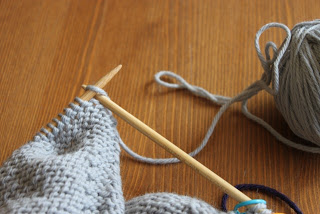
As you can see from the picture above, the WS of the row is now facing you. If you are doing the knitted-on cast-on method, you insert your right needle into the first stitch on the left needle as if to knit. You go ahead and knit it, creating 1 new stitch on the right needle, but don’t pull the original stitch off of the left needle. Instead take the new stitch that is on the right needle and slip it onto the left needle. 1 stitch has been cast-on. Since it’s hard to photograph the above steps, check out my video for the knitted-on cast-on method here (or I have the cable cast-on method here).
Once all the stitches are cast on, here is what it will look like:
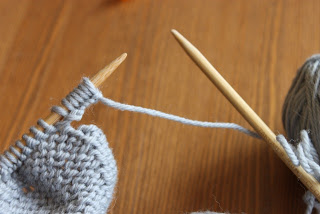
3) Direction: …turn work back over & remove next marker, k2 (giving the first st a tug before knitting it, to tighten it up), remove next marker…
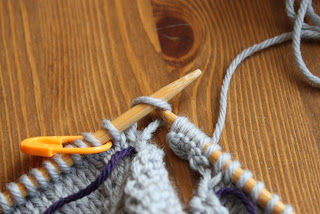
In the above picture, I had just removed the first “next marker” and am about to “k2”, making sure I’m giving the first stitch a tug. This is the point where are you joining the back and front piece of the sweater together. Don’t worry if there seems to be a little hole or looseness at this point. When you are finished and weaving in ends you can easily tighten up any holes that may appear at the underarm
Once this step is done, you’re done! Well, at least with the first underarm. You’ll have to repeat one more time on the other side. The below picture shows what it looks like when one underarm divide has been completed for one sleeve:
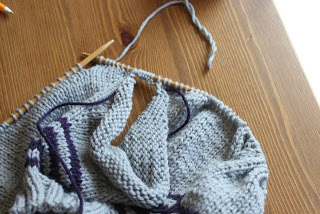
Once the underarm divide row is complete you can actually try the sweater on. I’d recommend knitting a few rows after the underarm divide before you do this, just to give those cast on underarm stitches some stability. The best way to do this is to transfer all of the stitches onto a really long piece of scrap yarn. Yes, it’s kind of tedious, but it will give you a really good idea about how the yoke of the sweater will fit you. If you are not happy with how it’s fitting in the armholes you can make some adjustments:
If the armhole is too short (i.e, too tight), you can rip out the underarm divide row and work a couple more rows before you work the underarm divide. If you are okay with the body width and it’s just the length you need, then don’t work any raglan increases.
- If the armhole is too short (i.e, too tight), you can rip out the underarm divide row and work a couple more rows before you work the underarm divide. If you are okay with the body width and it’s just the length you need, then don’t work any raglan increases.
- If the armhole is too long, you can rip out the underarm divide row and a few rows above that too, then work the underarm divide row (so essentially working the underarm divide row a few rows earlier than instructed)
- If the depth of the armhole is fine but you feel the bust is too wide, you can rip out the underarm divide row and re-do casting on less stitches at the underarm
In the first two scenarios, changing the number of raglan increase rows will affect your finished bust measurement. If you wind up working more raglan increases (to create a longer armhole depth) then cast on less stitches at the underarms (this way your bust measurement won’t get too big). If you do less raglan increases (because the armhole depth was too long), then you may need to cast on more stitches at the underarm so the sweater still fits your bust.
If you ever need help on figuring out how to adjust a raglan to fit you best, feel free to shoot me an email.
I hope this tutorial helped!
Note: need help working the sleeves? Check out part 2 of this post!

makes sense to me, thanks!
Very helpful, thank you! Your designs are beautiful and may just inspire me to tackle my first-ever knitted sweater.
this is great. but I need the next step. Can I pick up from those cast-on stitches when I start the sleeves. Or how do I sew the underarm closed so I don't have a bulky seam??
Hi Laurie,
Yes, when its time to do the sleeves to can pick up those underarm cast on sts instead of having to seam. Makes the sweater totally seamless!
So when its time to do the sleeves, you'll transfer all of the sts that are currently on the scrap yarn onto a 16" circular needle (in the same size needle as you did the rest of the sweater). Then you'll pick up and knit the underarm cast on sts, plus usually 1 stitch on either side to avoid holes. Once the appropriate number of sts have been picked up, you join to work in the round.
Hope that helps!
Great tutorial, thanks for sharing. I'm also with Laurie though, kinda always stuck on that next step once you're ready to finish the sleeves. I don't understand what you mean by "pick up"… to me that term means we are adding more stitches, but it seems that you are referring to picking up those stitches you already created? I just can't figure out how to avoid the hole that is cause right at the join of the sleeve?
Hi Speedycrafter,
It sounds like it might be helpful for me to do a tutorial on working the sleeves–I will do that soon!
To answer your question, yes–you are picking up stitches that were already created (the underarm stitches you cast on using the knitting on cast-on technique).
It would probably make more sense if I showed some pictures so I will work on that and post soon.
Thanks!
Thank you so much for writing this tutorial. I've knit a number of raglan patterns and have inevitably been unhappy with the final fit of the garment. I was never able to figure out how to fix the raglan increase/sleeve/bust fit on my own. I always thought the problem was because I'm petite. You explained it easily and clearly. Thank you!
Hi there,
I am knitting a baby sweater and I have the stitches transferred to the stitch holders and am working on the right sleeve. The pattern:
Right Sleeve:
CO 2 sts using the Cable Cast On or Knit Cast On for underarm, p rem 27 sts
CO 2 sts, k rem sts – 31 sts
I have 27 stitches on my working needle (left needle) so if I do 2 cable cast on, I will have 29 sts. But how do I purl the remaining 27 sts when I have 2 extra stitches at the beginning of my needle? This is on the wrong side.
Also, the following row states that I should do 2 more cable cast on stitches and knit the remaining stitches. How do I do that? I mean, I have 2 extra stitches at the front, again. This is the right side.
Hope I don't sound too confusing (or confused). Thanks.
Hi There!
I will try to help! Here is my take on those instructions although I’m not familiar with the pattern you’re working on so this is just my guess:
-Working on a WS row, you will cast on 2 sts for the underarm, then purl all the stitches on the needle (I think that the instructions say 27 to reflect that you should purl all the existing sts but perhaps overlooked to include the 2 additional sts you just casted on)
-Once you get to the end of the round, flip the work over and cast on 2 more sts, then knit to the end
I’m not sure if this sleeve is knit in the round or not so I’m not sure what the next step would be, but that’s my take on it. Hope that helps!
http://www.straw.com/cpy/patterns/baby-child/bamboozle-baby-jacket.html
Hi Elizabeth,
Thank you for the reply. I had no idea what to do and in the end, I ended up just slipping those cast on sts to the right needle and purl and knit the following rows as per instruction.
The pattern link is at the top. Think I should unravel and do it again? I mean, I'm doing the left sleeve now. Oh well, live and learn, eh?:)
Thanks again.
I say, if you're okay with how it turned out then just keep knitting the way you are. The instructions weren't the clearest so I completely understand the confusion.
Live and learn is so right…I've said that to myself over MANY knitting patterns that's for sure!
Many, many thanks for this tutorial. I've been going mad, trying to figure out how to cast on these stitches. None of the instructions mentioned that it was o.k. or expected to flip to the "wrong" side and do the knitted cast on. It might seem like common sense to some, but I'd only seen it demonstrated at the edges and on the right side…my last raglan, I purled new stitches on and that was after retrying about a dozen times. Such a small detail, yet it helped me out immensely.
This was exactly what I needed to know. Thank you so much!
Thank you so much! Now I know why and how those stitches are inserted.
I’m knitting up the Abbi Shawl Collar Cardigan and am getting ready to do the first underarm divide, attempting to use the above as guidance…but are there any videos?! A bit worried here.
I’m guessing if I follow the instructions I’ll have both sleeves on scrap yarn, and then I’m supposed to start in on the “body” section?
The second part of this question is how to I pick up and start the aforementioned “body” section – the pattern says “work in St st until measures…”…so where do I pick it up? I’m fairly new so need some help, thanks!
Hi Dee! I don’t have a video but I found this one on YouTube that I think will be helpful. She uses a different underarm cast-on technique (she uses backward loop whereas I usually instruct knitted-on cast-on), but the construction technique is the same. https://www.youtube.com/watch?v=8nU-u__w6uQ
Perhaps after viewing this video it will be more clear about how you work the body – because after the underarm divide you will just start working the body (there’s no picking up). But if you still have questions just let me know!
Happy knitting 🙂
-Elizabeth
Thanks Elizabeth, I followed the video and it all made sense! I’m almost done with the body now.
Very helpful post, especially since my pattern had no explanation whatsoever. Thanks!
Hello! Just wanted to leave a note and thank you for this tutorial! I am working on a sweater and was struggling with figuring out how to do the knitted cast on because after I fasted on the working yarn was in the wrong place! My patterndidnt say to flip the work to do this. I looked at many sources and couldn’t find any help and your tutorial was perfect!! Thanks again!
So glad it was helpful! Thanks for taking the time to leave such a nice message 🙂
Great tutorial. Working on the Concetta Cardigan and this made the process very clear. Thank you.