Morgan Cardigan Tips
Welcome to the Morgan tips page! On this page you’ll find lots of tips and technique tutorials to help you make your own Morgan cardigan (whether the worsted-weight or sport-weight version!) Here is a list of the tips you’ll find:
- Picking a size
- Yarn Options
- Swatching and tips on measuring your swatch
- How to “read your knitting” with this stitch pattern
- Tips on following pattern instructions
- Keeping track of rows in hem
- Tips on where to join a new skein.
- Tutorial on joining Fronts and Back together.
- Back Underarm
- Tips on working short rows in this stitch pattern
- Technique tutorials: long tail cast-on, cable cast-on, wrap & turn short rows, three needle bind-off, magic looping your sleeves and wet blocking.
Also, if you want some inspiration, check out my Morgan Preview Knitters page where I have photos of finished Morgans in different versions and sleeve options! Click here to view that page.
1. Picking a Size
Because of the drop-shoulder construction of this cardigan, the suggested amount of positive ease is approx 8-12″/18-25 cm. So picking a size whose finished measurements are approximately 8-12″ larger than your actual chest measurement. If you would like to learn more about ease, click here to read my blog post about ease in general or click here to read my blog post about ease in drop-shoulder garments. Also, check out my Morgan preview knitters page to see photos of finished Morgans and how much positive ease each of the knitters is wearing their Morgan with.
Based on the suggested ease, if you are wondering how the size numbers might correspond to traditional sizes such as S, M, L, etc. below is an approximation. As you’ll see, there are many sizes that have an overlap (for example, a bust of 38″ falls within the range of both a M/4 and a L/5. In those cases, it will just depend on your preference. Keep in mind though that this is approximate and should only be used as perhaps a starting point to deciding on your size:
| Your Actual Bust/Chest Measurement | Traditional Size Label | Size in Morgan Pattern |
| 26-30″ | XXS | 1 |
| 30-33″ | XS | 2 |
| 32-36″ | S | 3 |
| 35-39″ | M | 4 |
| 38-42″ | L | 5 |
| 42-46″ | XL | 6 |
| 45-49″ | 1X | 7 |
| 48-52″ | 2X | 8 |
| 52-56″ | 3X | 9 |
| 56-60″ | 4X | 10 |
| 59-63″ | 5X | 11 |
| 62-68″ | 6X | 12 |
With all of this said though, you can choose to knit a size that has less than the suggested range if you prefer less ease in your sweaters. If you do though, please consider this alteration:
For the armhole depth (which occurs right after the Underarm Divide), follow the rows/length instructions for the size you would have knit should you have followed the suggested ease. For example, if you have a bust of 38″, but instead of knitting size 4 (which would have given you 8-12″ of positive ease) you decide to cast-on for size 3 so it’s a bit more fitted, you should follow the size 4 instructions for the number of rows and/or length to work for the armhole depth.
Additionally, you should do the same for the sleeves. Using the same above example, had you cast-on for size 3 for less ease, you should follow the sleeve instructions as if you were knitting size 4. If you need help for your particular situation, feel free to reach out to me – I’m always happy to help!
2. Yarn Options
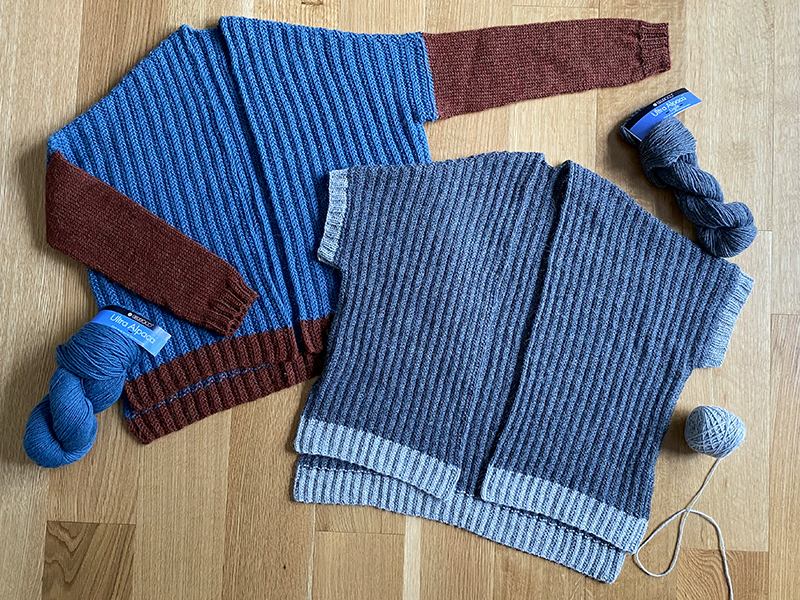
In my finished samples, I used Berroco’s Ultra Alpaca yarn (the original “Ultra Alpaca” for the worsted-weight and “Ultra Alpaca Light” for the sport/DK-weight version). In both versions I use a main color for the body, and a contrasting color for the bottom hem and sleeves/armhole trim (however you can choose to omit the contrasting color if you prefer, or only use it in the hem – whatever you prefer!).
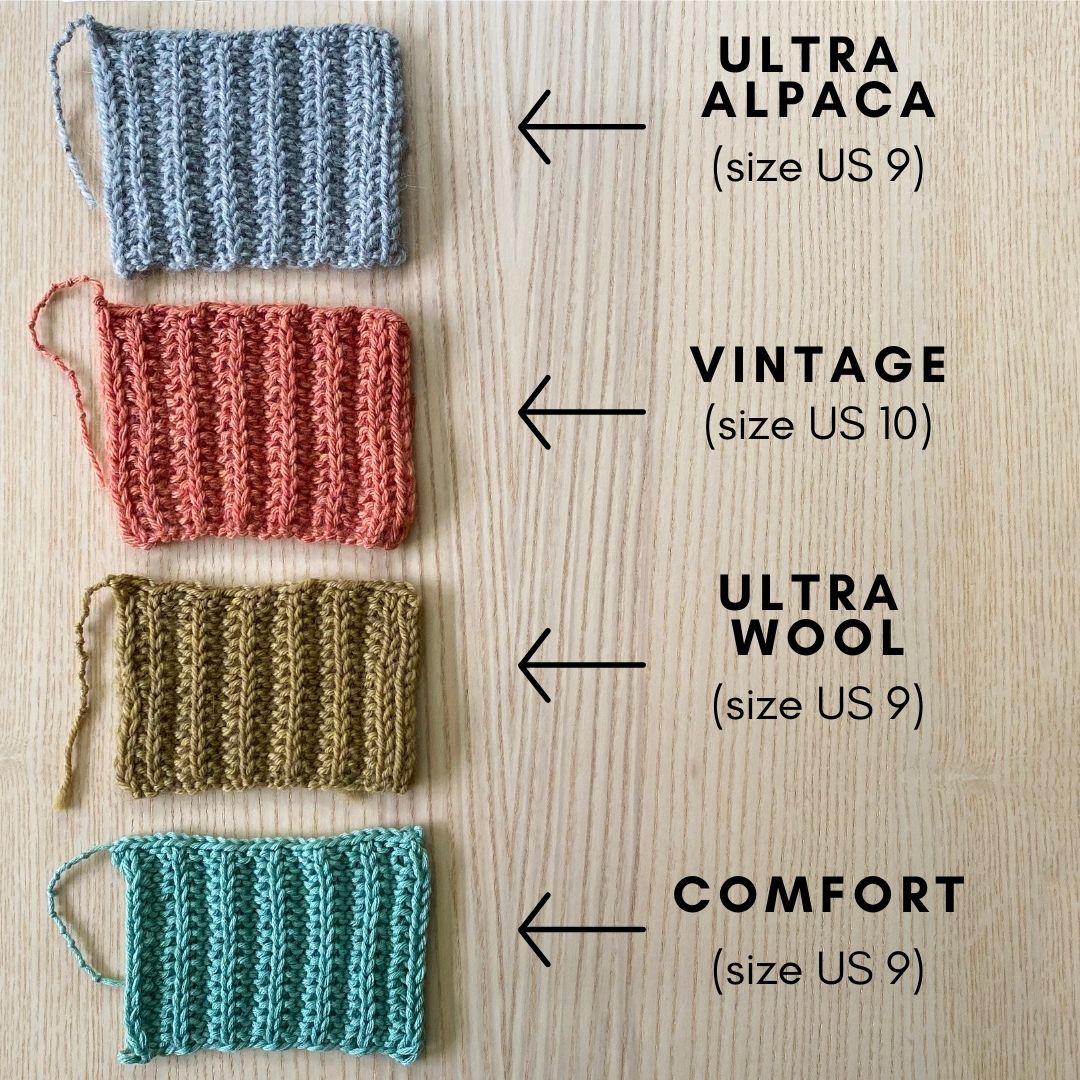
I also did some swatching in some other Berroco yarns to help give you an idea of how the cartridge belt stitch pattern would look in other yarns and if you may need to adjust needle size if you used a different yarn. Please note: everyone’s tension can be different so the needle sizes I list are just what I needed to use to get the right gauge – you should swatch to see if you need to adjust your needle size to attain the same tension.

Worsted-weight version:
To get the stitch gauge of 21 sts = 4″ using Berroco’s Ultra Alpaca yarn, I was on a size US 9/5.5 mm needle. When I swatched with their Vintage yarn, to get the same gauge I had to bump up to a US 10/6 mm needle, but with their Ultra Wool and Comfort yarns I was able to get gauge on the US 9/5.5 mm:
Sport/DK-Weight Version:
Sport and DK yarn can often be used interchangeably which is why I say this version can work for either of these 2 yarn classifications. To get the stitch gauge of 27 sts = 4″ using Berroco’s Ultra Alpaca Light yarn, I was on a size US 6/4 mm needle. When I swatched with their Remix yarn I got the same gauge on the same needle, but with their Vintage Baby and Vintage DK yarn I had to bump up to a US 7/4.5 mm needle to get the correct gauge:

It’s so interesting to also see how different the stitch pattern looks in these yarns. In Ultra Alpaca (worsted and light), after blocking the stitch pattern flattens out quite a bit (due to the drape of Alpaca). But in the Vintage (worsted or DK), it stays plumper (which is probably why in both cases I had to bump up needle sizes). For the sport/DK-weight version, Remix Light matched the gauge on the same needle size as Ultra Alpaca Light, but the fabric is much more textured and flat. It’s always so interesting to see how different fiber contents can interpret a stitch pattern so differently!
One additional thing I wanted to mention – this stitch pattern is much more dense than regular Stockinette stitch. For example, as I noted above, for the worsted-weight version I used Ultra Alpaca on a US 9/5.5 mm needle and in this stitch pattern my stitch gauge was 21 sts = 4″ (so 5.25 sts per inch). But on that same needle, when I work in Stockinette stitch, my stitch gauge is 16 sts = 4″ (so 4 sts per inch). That’s a BIG difference! So the lesson is this: you’ll likely be on a larger needle than you think to get the right stitch gauge in the cartridge belt rib stitch pattern.
3. The Cartridge Belt Rib Stitch Pattern & Swatching
The whole body of this garment is knit in the Cartridge Belt Rib stitch, so this is the stitch pattern you want to swatch in to determine what needle size you should be using. As I mentioned above, this stitch pattern is pretty dense and will give you a tighter gauge than stockinette stitch. But since everyone’s tension can be different, it’s important to swatch to make sure you are on the right needle size to get the right gauge. Swatching is also very important because it will get you comfortable with this stitch pattern – it’s not a hard stitch pattern but it’s most enjoyable once you’ve found your rhythm with it and you’ve learned how to read your knitting. In cartridge belt rib stitch video lesson (available here, or embedded below), I talk all about this stitch pattern, show you how to work it, and provide tips on how to ‘read your knitting’ to help avoid mistakes:
How to make your swatch:
You will want to cast-on a multiple of 4+3. For the worsted-weight version, I recommend that you cast-on 31 stitches and for the sport-weight version I recommend that you cast-on 39 stitches (note: in my video above I cast-on 27 sts with worsted-weight yarn – this number can also work but I feel 31 is better to allow for extra room to measure). I also recommend that you work a slip stitch edge in your swatch (since you’ll be doing that in the garment) and this will give you a little practice with that! So in the stitch pattern listed below (as well as shown in the above video), I have included this edging (it’s created by always slipping the last 2 sts of every row).
- Row 1 (RS): k3, [sl1 wyif, k3] to 4 sts before end, sl1 wyif, k1, sl2 wyib.
- Row 2 (WS): p2, [k3, sl1 wyif] to 5 sts before end, k3, sl2 wyif.
Tip: Place a removable stitch marker on the RS of your work to help differentiate the RS from the WS.
Tips on Measuring your Swatch:
- Measure your swatch before blocking AND after! Most yarns will grow after blocking in this stitch pattern, so it’s very important to block your swatch. In my Berroco Ultra Alpaca swatch, my stitch gauge before blocking was 23 sts = 4″, but after blocking it was 21 sts = 4.”
- Don’t worry if you don’t get row gauge – stitch gauge is more important. If your row gauge is off, you can just knit more or less rows to accommodate it. I provide actual length measurements for the body length and armhole depth so you can adjust as needed if your row gauge is off.

Because the cartridge belt rib stitch has lots of texture, it can be tricky to see the stitches when measuring. Here is a tip: See how you have these columns of elongated “v’s”? Those are slipped stitches and that counts as 1 stitch. In-between each column of slip stitches is 3 stitches. So when measuring, just know that 1 slip stitch and the stitches in-between = 4 stitches. This makes it much easier as you count your stitches! See the zoomed-in photo below for a visual of this:

Now what about measuring your rows? Here is another tip – measure a slip stitch column! But here is the most important detail: 1 slip stitch = 2 rows.

So just measure however many “v’s” you have in 4″ and then multiple that by 2 to get your row gauge.
A note about sleeve gauge: If you are making long sleeves, your sleeve gauge will be different than your body gauge because the sleeves are worked in Stockinette stitch (in the round) instead of the cartridge belt rib stitch. In order to get the sleeve gauge listed in the pattern, you will likely just need to use a needle size smaller than what you used for the body (even though the gauge for the sleeves is looser, it’s because the stitch pattern is so different!).
4. How to “read your knitting” in this stitch pattern
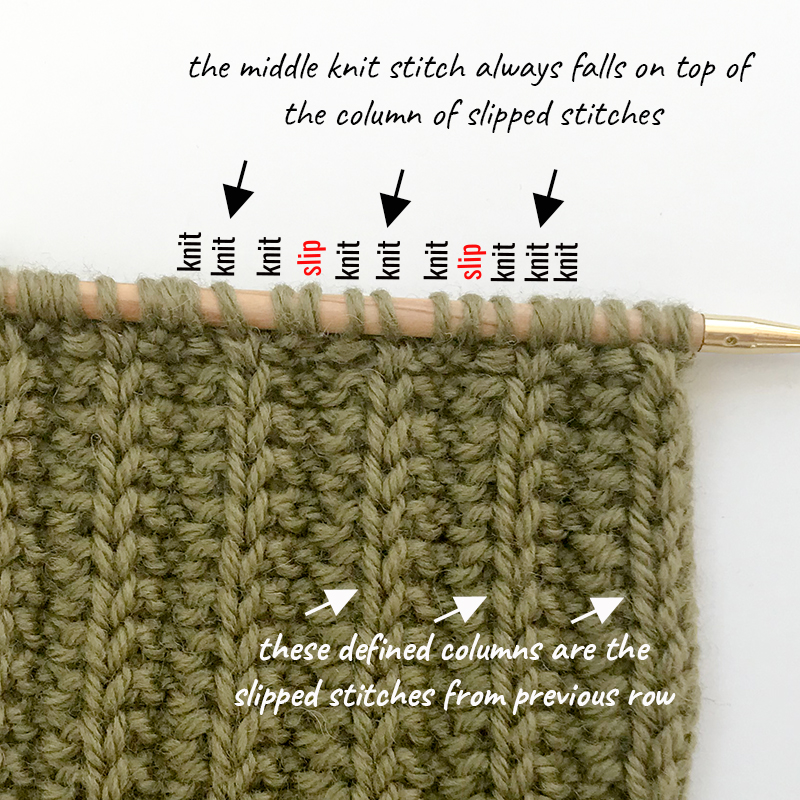
You’ll have lots of inches to knit in the cartridge belt rib stitch and the best thing to do to avoid mistakes and having to tink back is to learn how to “read your knitting” with this stitch pattern. I talk all about this at the end of my video posted above, so I highly recommend you check it out (I get into the “reading your knitting” part at the 11:32 mark). Reading your knitting is when you can visually see the stitch pattern in the fabric, using visual cues in the fabric to know what the next stitch will be (and to see potential mistakes before it’s too late). In the cartridge rib stitch, on every row, you’ll be repeating a sequence that is either [k3, sl1 wyif] or [sl1 wyif, k3] – in either case, when you are working your “k3”, the middle stitch always falls right above the previous row’s slip stitch column. This visual cue will help you stay on track and will help you avoid having to rip out entire rows (you may just have to tink back a few stitches to get back on track). Here’s a visual of this:
5. Tips on Following Pattern Instructions
Because the pattern includes instructions for both worsted-weight as well as sport/dk-weight, and because there are also 12 sizes to pick from, the pattern may seem really long! But that’s not because it’s complicated or has a lot of steps to it – the length is just because of the amount of options I’ve provided.
One helpful tip I have is that once you decide on the yarn-weight and your size, take the time to circle or highlight the areas of the pattern that apply to your chosen yarn-weight and chosen size. It may help as a guide for you as you make your way through each section.

6. Keeping track of rows in the hem
Both of the Fronts and the Back are worked separately at first, to create the split hem. On all pieces, you work the bottom 1.75″ in the contrasting color (although that is optional of course) – if you would like to ensure that all pieces’ contrasting color block is the exact same length, I recommend keeping track of the rows you work and this way you can be sure to work the same amount on all pieces. You can keep track using a row counter, or by just keeping notes on the pattern or a separate piece of paper.
In addition, for the Left Front Hem, after you work the contrasting color block for 1.75″, you will then work in the main color until the whole piece measures 4″ (section 2). Because you will do the same on the Right Front and because you want to make sure your Left Front and Right Front Hems measure the same, I would also highly recommend keeping track of your rows here in this section – this way, when it comes time to do the same on the Right Front Hem, you’ll know the exact number of rows you should be working.
7. Where to join a new skein of yarn
A tip I have for any open-style cardigan (whether it’s this design or a different one) is that you should avoid joining a new skein of yarn at the beginning or end of row. Instead, I recommend joining towards the side (typically closest to your underarm side). This is because you don’t want ends showing if your open-style cardigan front flaps open (since there aren’t any closures). Just a little tip that I learned the hard way years ago so I always like to mention it in any of my open-style cardigan designs!
8. Joining Fronts & Back Together
To create the hi-low split hem, the Back and each Front are worked separately. Once the hems are done, it will be time to join them all together. The first tip is to make sure that all of your pieces are facing the right way – their right side should be facing you (it should look like below):

Another big tip I have for this is that when you go to knit the first stitch on the piece you are joining, knit that first stitch with both the working yarn and the tail that you will have hanging off of the piece to be joined.

This helps to reinforce the join – I just knit the first stitch this way and then I dropped the tail and knit the remaining stitches with just the working yarn. And don’t worry if things seem a little loose after the join – you can reinforce things more when weaving in ends at the end. Another tip that one of my testers shared with me was to use a removable stitch marker to attach the pieces together – this not only helps for when you initially join but also helps keep the pieces from twisting on the next few rows (I talk a bit more about twisting a little further down). Here is a picture that shows what this looks like:

After you have joined one piece to another and your side markers are placed, it will look like this:

Here’s another important tip: After you have joined the Left Front to the Back and then the Back to the Right Front, before you work your next row, make sure that the side stitches aren’t twisted. Things may have flipped around on your joining row and so it’s important to make sure your side stitches are all laying flat before you proceed. Here is what a twisted side stitch looks like:

To fix this, I just flipped my Front around and it untwisted:

9. Back Underarm
On page 9, after you have finished both the Left and Right Front yokes, it’s time to work on the Back. On the Left and Right Fronts, you had used the cable cast-on to create your 4 underarm stitches on either side. The purpose of these stitches is to extend the armhole out a bit which I find helps for arm movement. The Back underarm is worked a bit different though – instead of casting-on stitches on either end, you’ll pick up and knit into the underarm stitches from the Fronts! What this does is avoid having to seam up underarm stitches later on. And it may seem tricky at first, but once you see a visual of the process, you’ll see it’s not that hard at all. You can watch my video tutorial of this process here where I show you how it’s worked in my Azalea top – it’s a different design but the steps in the process are the same as for Morgan.
10. Short Row Marker Trick
I used the wrap & turn short row technique to shape the shoulders in this garment. Because of the nature of this stitch pattern, I have placed all of my wrap and turn short rows in very particular places so that the wrap and the short row don’t interfere with the stitch pattern. For this reason, I don’t recommend that you substitute in a different short row technique (like German short rows).
Another tip that really helped me was that after each wrap & turn, I placed a marker – this was really helpful because in this stitch pattern it’s tricky to see the wraps. And as you are working your short row instructions it will say to work to a certain number of stitches from the “previously wrapped stitch.” If you place a marker after each “turn”, you’ll then know exactly where your previously wrapped stitch is. So I highly recommend this tip!

Then, after all short rows are worked and you are on the Final Back Rows Section, when you are instructed to work to the end of the row ‘knitting wraps as you reach them’, you’ll remove each of these short row markers before you work the wrap with the next stitch.
11. Technique Tutorials:
Below are my video/photo tutorial links to different techniques used in the pattern should you be new to any of them (or just need a refresher!).


