For beginner knitters, one of the tricky things that is part of the learning curve is how to interpret knitting patterns. At times it can feel like you’re trying to learn a totally different language! The good thing is that even amongst very different pattern writers, many of the same elements are found. And so over time you start to become more and more comfortable reading patterns.
Throughout my years as an instructor, yarn shop associate and designer, I have answered lots of questions about pattern reading basics and thought I would compile what I’d consider to be my “top 10 questions” list. I hope you might find my answers helpful, whether you are a new pattern reader or not!
1. How do I read the format of multi-size instructions?
For patterns where there are multiple size options given, you will see numbers (whether they are yardage amounts, cast-on stitches, or number of rows) listed in this type of format: 1 (2, 3, 4, 5) (6, 7, 8, 9, 10) – note: it’s not always this many placements and sometimes the parenthesis are around less/more numbers, but this is the general format.
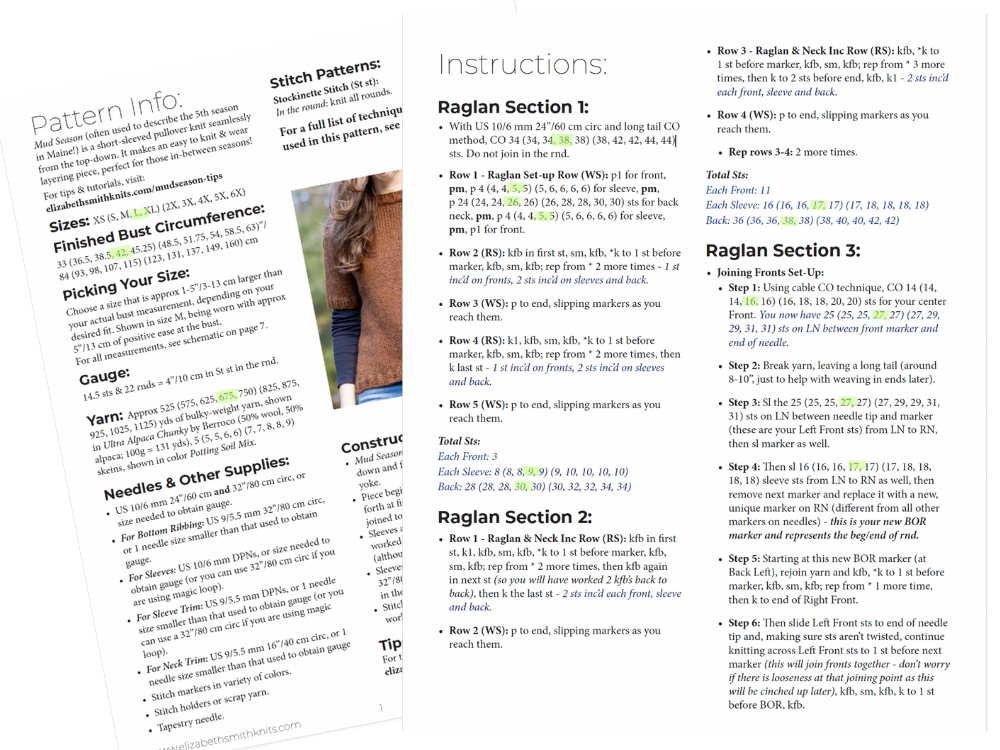
First, to figure out which number you should be following you have to determine what size you’re making. On the first page of a knitting pattern, you’ll find sizing labels and finished circumference. Below is an example from one of my sweater patterns:
- Sizes: XS (S, M, L, XL) (2X, 3X, 4X, 5X, 6X)
- Finished Bust Circumference: 33 (36.5, 38.5, 42, 45.25) (48.5, 51.75, 54, 58.5, 63)”/ 84 (93, 98, 107, 115) (123, 131, 137, 149, 160) cm
If you determine that you want to make the size 42″/107 cm, that is the 4th number listed under “Finished Bust Circumference” (and the 3rd size within the 1st set of parenthesis). And so that corresponds to the sizing label of size L (listed as the 4th size in the sizing label).
So anytime in the pattern where numbers are listed in this type of format, you should be following the 4th number in the sequence.
For example, this patterns says to “CO (cast-on) 34 (34, 34, 38, 38) (38, 42, 42, 44, 44) sts“. So if you wanted to make the size L, then you would CO 38 sts.
Helpful Tip: If a pattern has a lot of size options (as my example above), it can be helpful to highlight the number that pertains to you throughout the pattern before you begin. So if you were making the size L (the 4th size), you would review the pattern and anytime you see numbers listed in this way you would highlight the 4th number (as I’ve illustrated below):
2. What does “Repeat from *” mean?
A common instruction you’ll find in knitting patterns is something like this: *k to 2 stitches before marker, k2tog, sm; rep from * 2 more times.
Whenever you see an asterisk (*) that means you are encountering a repeat sequence. This repeat sequence starts where you see the asterisk (*) and ends when you either see a semicolon (;) or just a comma (,). In my patterns I use a semicolon. You will work it in its entirety, and then after the semicolon you will be instructed to repeat it a certain number of times.
In our above example, the sequence is “k to 2 stitches before marker, k2tog, sm“. After the semicolon, it says to rep from * 2 more times (rep = repeat). So that means you will repeat everything that was in-between the asterisk and the semicolon 2 additional times. So in this example, you will have worked the repeat sequence a total of 3 times.
3. What does it mean if instructions are in brackets?
Another method or communicating a repeated sequence in a pattern is the use of brackets. Here’s an example: [k2, p2] to last 2 sts, k2.
Anytime you see instructions in brackets, it means it’s a repeated sequence. So in the above example, “k2, p2” is the repeat sequence and so the instruction is translated: repeat the sequence of k2, p2 over and over again (so, k2, p2, k2, p2, k2, p2, etc) until you reach the last 2 sts (then the repeat sequence ends). Then you k2.
Sometimes a pattern may use “rep from *” and brackets all at the same time. Here’s an example: *p2, [k2, p2] to marker, sm; rep from * 1 more time.
This translates to: p2, then work the repeat sequence of k2, p2 over and over again until you get to the marker, then slip the marker. And then repeat that entire sequence starting where the asterisk is (so at the p2 before the bracket) and you repeat that entire sequence just 1 more time.
4. When it says to repeat rows, do I include the first time I work them?
A common thing you’ll see in knitting patterns is that it may list a series of rows, and then underneath those rows it will say to repeat the rows x times. Let me give you an example:
- Row 1 (RS): k to end.
- Row 2 (WS): p to end.
- Row 3 (RS): k to end.
- Row 4 (WS): k to end.
- Rep rows 1-4: 2 more times.
When you encounter this, you should work rows 1-4 and then you’ll repeat those rows 2 additional times. So in this example, 12 rows will have been worked total.
5. How do I interpret repeating a row every xth row x times?
Often found in increase or decrease areas of a pattern, a common instruction is something like this:
- Next Rnd – Dec Rnd: k1, ssk, k to 3 sts before marker, k2tog, k1
- Work in St st, repeating above Dec rnd: Every 8 (7, 6, 6, 6)th rnd 7 (8, 8, 9, 9) times.
The above translates to this:
- You’ll first work the decrease round as written.
- Then in the second bullet point, that translates to: you’ll work each round in St st (stockinette stitch), but repeating the decrease round every 2 (3, 3, 4, 4) rnds. So that means working in St st for 7 (6, 5, 5, 5) rnds and then on the next rnd you repeat the decrease round.
- And you’ll do 2 (3, 3, 4, 4) times total.
So if you were making the 3rd size (so the 2nd size in the parenthesis), you will work in St st for 5 rnds and then work the decrease rnd and you’ll do that a total of 3 times. So it will look like this:
- St st for 5 rounds
- Dec rnd
- St st for 5 rounds
- Dec rnd
- St st for 5 rounds
- Dec rnd
Helpful Tip: I like to write on the pattern, or on a scrap piece of paper, an outline of my sequence where I use tally marks to keep track of my plain St st rnds and then a checkmark to mark when I’ve worked the dec rnd. So the above example would look something like this:
6. Why are there so many abbreviations and what do they mean?
Abbreviations are used in knitting patterns for a few reasons. They make patterns shorter (so not as many pages to print) as well as much easier to read (less overwhelming text so the brain can take in the information better). I’ve often heard it explained that they are like contractions in English – just as we use the word “won’t” instead of “will not”, in knitting we use the abbreviation “k2tog” instead of “knit two together”.
There are many consistencies in the industry – “k” and “p” and often used to abbreviate “knit” and “purl”. But there are some abbreviations that are unique designer-to-designer based on their own preferences.
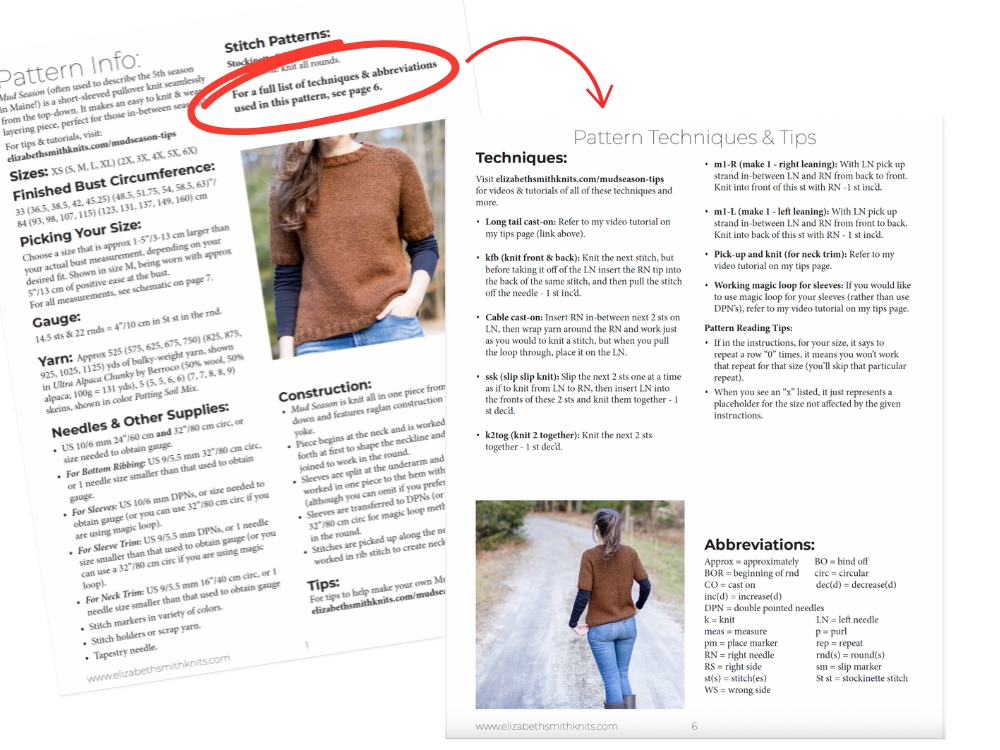
It’s always a good practice to review the abbreviations listed in the particular pattern you’re working on. In most of my patterns, I provide a note on the Pattern Info page telling you which page you can find a list of techniques and abbreviations, as illustrated below:
7. Is “break yarn” the same thing as “cut yarn”?
If a pattern tells you to “break yarn” it typically just means you need to cut it, so “break yarn” and “cut yarn” are often used interchangeably.
With wool yarns, you can technically just break it with your hands in order to sever it from the ball/skein and this just leaves a frayed end instead of a precise end via scissors. But other fibers (such as superwash) won’t break (or at least not easily!). Your only option is to cut it with scissors.
For either option, you just want to make sure to leave a decent length tail (my go-to is to always leave at least 8″ or so).
8. What does “x” or “-” mean in place of a number?
In some patterns, you’ll find instructions that say something like “Sizes 3 & 4: skip the next section and proceed to the next page“. And then in the instructions for that section it may look something like this: k 20 (24, x, x, 27) sts or k 20 (24, -, -, 27) sts.
Because sizes 3 & 4 are not affected by the given instructions (the pattern communicated that sizes 3 & 4 should skip that section), “x” or “-” is given as just a placeholder for those sizes.
9. What does “work as established” mean?
“Work as established” (or sometimes it’s abbreviated “est”) means to continue working in the manner in which you had been previously working. Here’s an example:
Let’s say a pattern has you working a 8-row lace stitch pattern in-between a set of markers and the rest of the stitches (outside the markers) are worked in Stockinette stitch. After the initial set-up rows, the pattern may say something like: “Work as est until piece measures 12″.
In this example, it would mean that you should continue working the rows 1-8 of the lace pattern in-between the markers (and keeping track of which row of the stitch pattern you’re on so it stays in pattern) while the rest of the stitches are worked in Stockinette stitch. And you would continue working this way until it measured 12″.
Helpful Tip: If you are asked to ‘work as established’ with a multi-row stitch pattern such as lace, it may be helpful to write out a table on a scrap piece of paper (or on the pattern). Here’s an example of what I would do with a 8-row lace stitch pattern that needed to be repeated and worked as established:
10. What does “join for working in the round” mean?
This phrase is either used after casting-on your stitches, or after picking-up stitches around an opening (such as around a neckline or sleeve). And it just means that you will bring your needle tips together and, starting with the next round, you will start working in the round instead of back-and-forth.
If it’s used after casting-on, it’s important to make sure your stitches aren’t twisted as you bring your needle tips together and then work the next round. For examples of joining both after casting-on as well as around a neckline, check out my tutorials below:
I hope this information has been helpful! Do you have any other pattern reading questions you would love to learn more about? Just send me a message!