One of the important elements of a knitting pattern is the schematic! What exactly is it and what is its purpose? That is exactly what I wanted to answer in this blog post. Below you will find details the explain what it is, why it’s important, how to interpret it and a list of FAQ’s I’ve received through the years that you might find helpful as well!
So let’s start with the basics…
What exactly is it?
A schematic is a visual/line drawing of the garment (often referred to as a “visual rendering”) as it would appear laying flat, along with measurements of each of the main areas for each size of the pattern. Think of it like a blueprint for a sweater!
A schematic gives you a flat visual of what the garment’s shape and silhouette are.
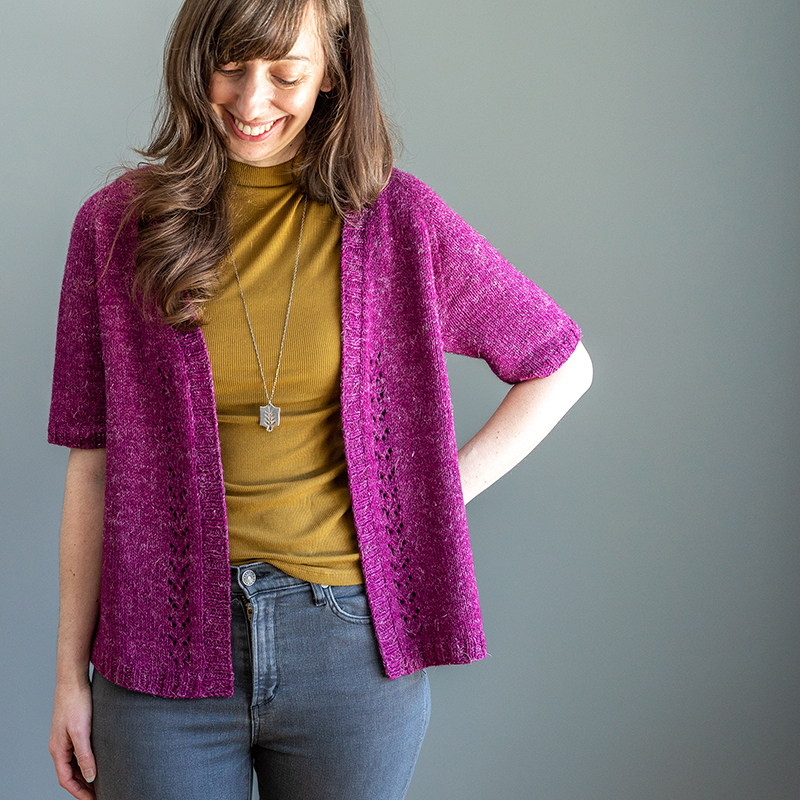
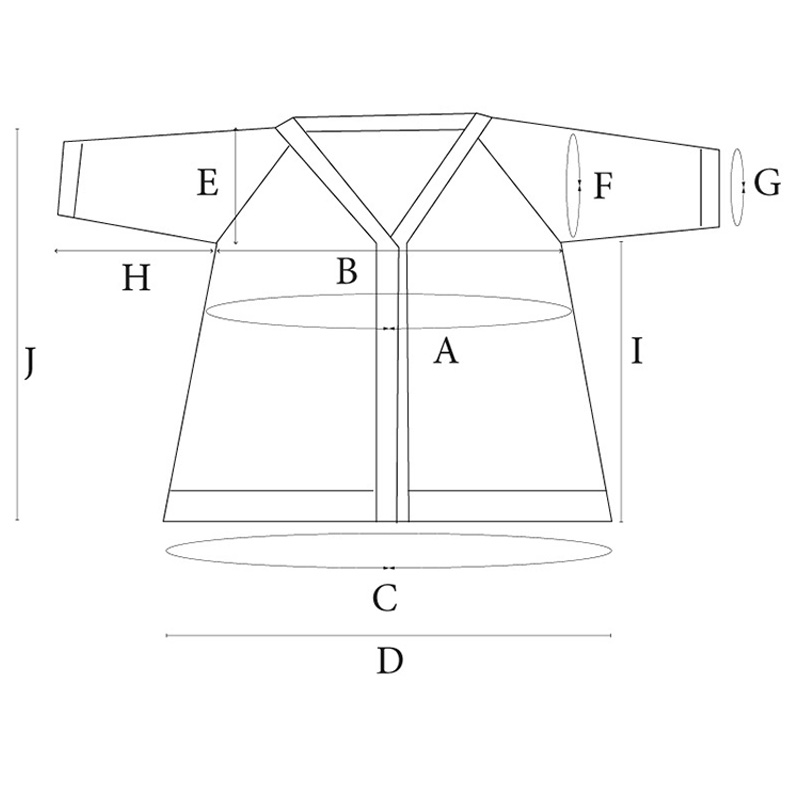
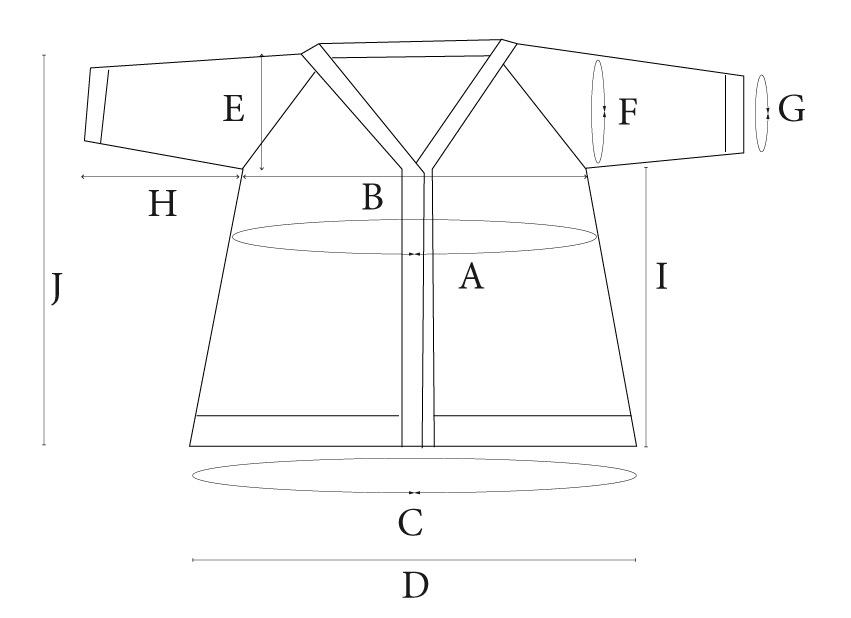
It can be hard to tell what a garment’s exact shape is when it is being modeled on a human body. So a schematic drawing helps to show exactly what type of shape the garment will have. Below is an example of my Rosanna Cardigan. First is the photo of it being worn, and then there’s the schematic. From the photo, you may not have seen the A-line shaping, or that the finished bust width/circumference is with the front bands overlapping (since I’m wearing it without buttons/closures). Having this flat rendering helps to show the full picture of the garment shape and silhouette.
A schematic provides more detailed garment measurements
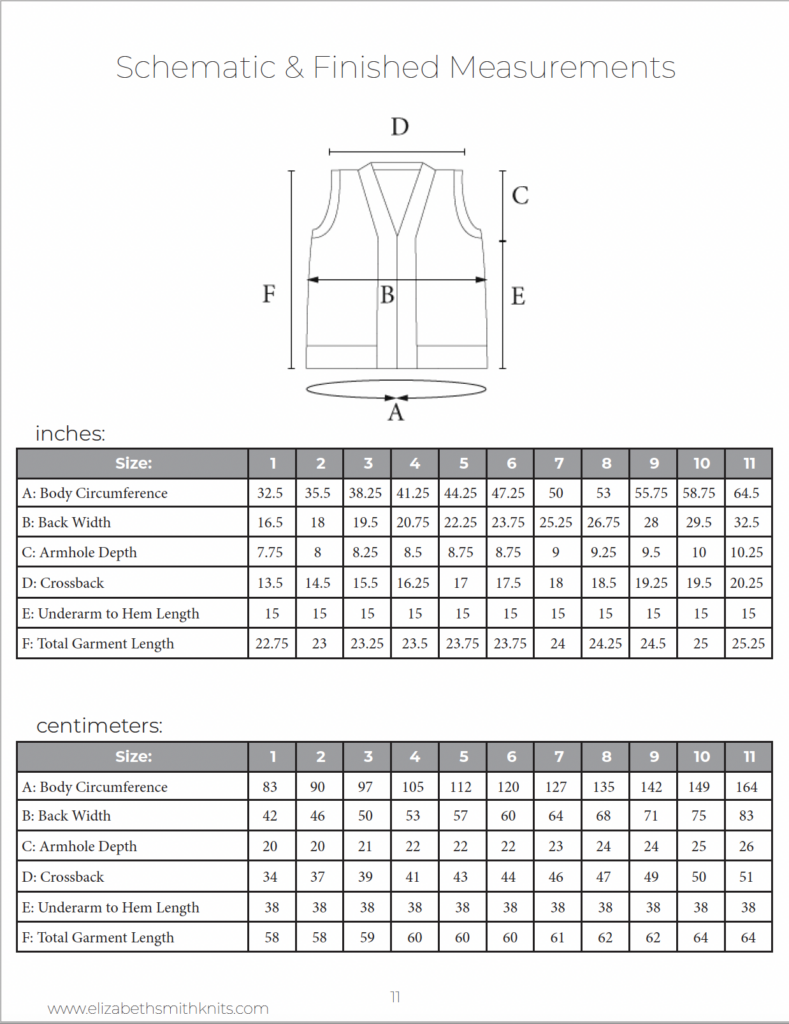
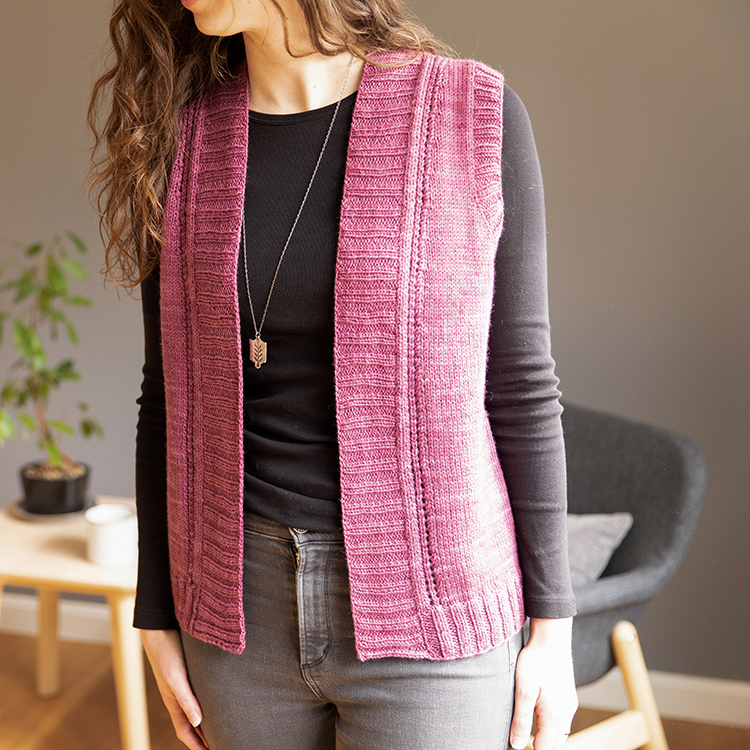
In all of my patterns, I typically provide the finished body or bust circumference on the first “Pattern Information” page. But this only provides one measurement. And although this measurement is key, it’s also important to understand all of the other measurements as well and to review all of those you’ll want to check out the schematic. In my patterns, the schematic page is located on one of the last pages of the pattern – below is an example of my Lilac Trail Vest schematic page (as well as a photo of that design):
As you can see, on the top of the schematic page I have the line drawing of the vest (as it appears being laid flat), with different directional lines that represent the different measurements and letters that represent what it’s measuring (and that you reference down below in the table), And then underneath the drawing I have 2 tables (one for inches and the other for centimeters), where you’ll find the letters (and descriptors) in the first column and then the measurement for each size in the columns to the right. This particular schematic provides information about not only the body circumference (A) but the body width with front bands meeting in the middle (B), the armhole depth (C), the crossback (D), the hem to underarm length (E), and the overall garment length from shoulder down to hem (F).
How exactly do you read a schematic drawing though?
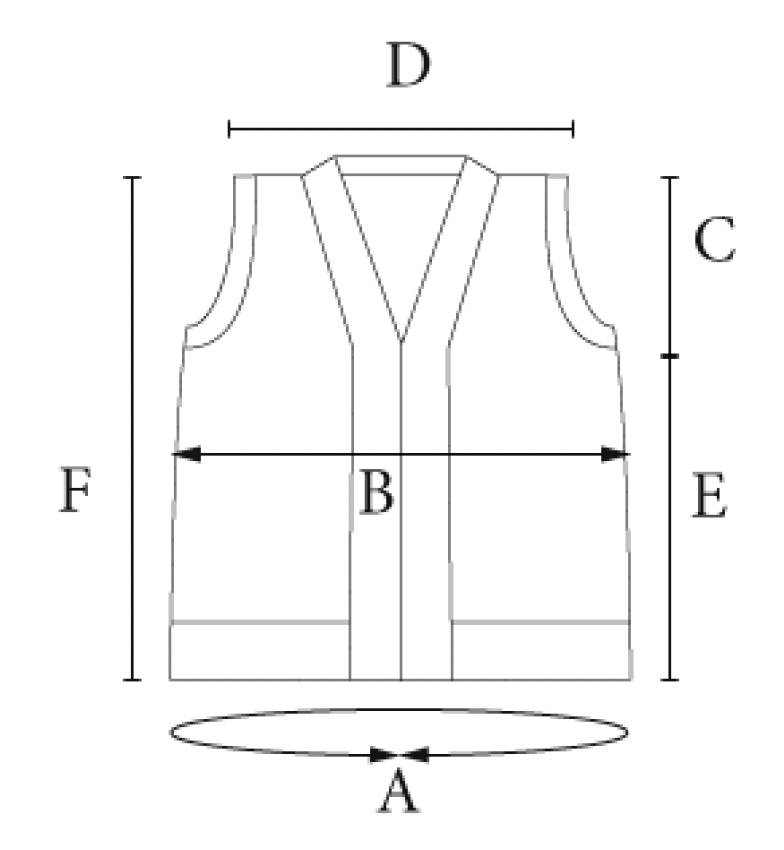
Let’s dive a bit deeper into understanding a schematic drawing. Let’s first start with my Lilac Trail vest schematic from above as that is a more basic one (so a good one to start with!). Let’s go back to the actual visual rendering:
Circumference measurements are typically represented with a circular arrow like you see above in “A”. Whereas the flat body width is represented with a straight line/arrow like you see above in “B”. Typically the body width measurement will be half of what the circumference measurement is (and sometimes designers will just leave the circumference measurement out of the schematic, assuming you’ll just multiple the width by 2 to get that number).
Let’s look at some of the other measurements now!
“E” shows the underarm to hem length. Note that “E” and “C” share a line, but there is a ‘notch’ (i.e, a small line going horizontally through the vertical line). When you see this in a schematic, just know that it means there are two measurements along that line that are split up. So “E” is the underarm to hem length whereas “C” is underarm to shoulder (the armhole depth). And then on the other side “F” is the total shoulder to hem length (so it’s the sum of “C” to “E”).
The last measurement in this rendering is “D”, the crossback measurement. This is a width measurement of the upper part of the vest (so the width after all armhole shaping is done). And as you can see, it also includes the armhole trim on either side.
A schematic can also help you understand how to measure certain sections.
Another useful element of a schematic is that, since it shows you how the garment looks flat, it helps you to then know what shape your garment should be in when you wet block it and how you should measure it. For example, below is my Rosanna cardigan schematic and as you can see, it’s a raglan-shaped cardigan:
Let’s look at the “E” measurement in particular. This is the armhole depth but as you can see, the measurement is not along the diagonal line of the raglan. The measurement starts at the top of the shoulder and goes straight down to the underarm – it doesn’t start at the start of the raglan diagonal line. This is how the sweater will sit on your shoulders, so this is how you should block it and measure it. So when you are placing a raglan sweater flat to block (or measuring the armhole depth), you’ll want to start the measurement at the top of the shoulder as illustrated in the schematic.
Schematics can also help you figure out where & how to make alterations
Understanding what the finished measurements are for these main areas of the pattern can be helpful when you want or need to make alterations. For example, understanding what the full garment length is can help you decide whether or not you want to make your underarm to hem length longer. Or, if you know you typically like to have your upper arm circumference at least a certain measurement, you can check the schematic ahead of time to see if it matches up and, if not, you’ll know ahead of time if alterations will need to be figured out.
Frequently Asked Schematic Questions
Q: Are schematic renderings built to scale?
A: For my schematics, the answer is mostly. The overall shape is to scale based on the sample size that I knit (I first draw the schematic on graph paper where 1 square = 1″, and then from there it’s built in a graphic design program). But every designer is different and sometimes you might just find a hand-drawn rendering where the scale may not be very exact (but provides a general picture).
Q: Do all designers create schematics the same?
A: Nope! When I first started designing I would just sketch out my renderings. I didn’t have access to the right software so I made due without, or found workarounds with other programs. If a different designer provides schematics differently, that is a-ok! Similar to my answer to the first question, the point of a schematic is to provide shape and measurement information and this can be displayed in lots of different ways.
Each designer will also have their own way for displaying the information. For me, in all of my most recent patterns, I put the schematic and measurement tables on one page. Other designers may make this information smaller and include it on a page with techniques and abbreviations. It’s all very subjective and up to the personal style of each designer.
Q: Do schematics include trim that is created by picking-up and knitting after the rest of the garment is complete (like a buttonband or armhole trim in a vest)?
A: Mine do, but other designers or companies may not. As you can see in both of my schematic examples above, you can see I’ve included the trim. Often it will depend on if the designer is instructing you to block before or after adding the trim. For me, I always instruct to block after everything has been done, including the trim. But some designers may recommend blocking before this step and in those cases, you’ll likely see the trim omitted in the schematic as the schematic is often used to represent the garment shape and measurements during blocking.

