Reading a knitting chart can seem confusing at first, but once you understand the basics you’ll realize that it actually makes perfect sense! In this blog post I’ll be explaining some of the very basics of knitting charts, including what they are, their benefits, and how they are read.
What is a knitting chart?
A knitting chart is a visual of a particular knitting stitch. Instead of using words to explain how a stitch pattern is worked in each row or round, a knitting chart uses symbols in graph-paper-like cells. Each cell represents 1 stitch. And each row of cells represents 1 row (or round) in the stitch pattern. Often you will see knitting charts for eyelet/lace, cables, or other complicated stitch patterns.
What are the benefits of using a knitting chart?
There are several benefits. Here are just a couple of them:
It provides a “big picture” view of the stitch pattern.
Unlike the written word, seeing the stitch pattern visually in a chart helps you to “see” the layout of the stitch pattern. For those that are more visual learners, or for those people who understand better when they can see the big picture, following a chart can be super helpful.
It can simplify a stitch pattern.
Some stitch patterns, when written-out, can seem confusing or jumbled just because they have so many stitches involved, or long repeats. But in a knitting chart, stitches are more organized and you may be less likely to get lost like you can in words.
It can make adjusting a stitch count easier.
When a stitch pattern is charted and you get that “big picture” view, it’s also easier to then know how you can add or take out stitches if you want to adjust the size of something. For example, if you are working on a scarf and want to use a thinner yarn than instructed (so you know you’ll need to add more stitches to get the proper width), you can look at the chart and better understand how many stitches you would need to add in order to keep everything in the correct stitch pattern/stitch count.
How do you read a knitting chart?
Here are some of the basic tips of reading knitting charts.
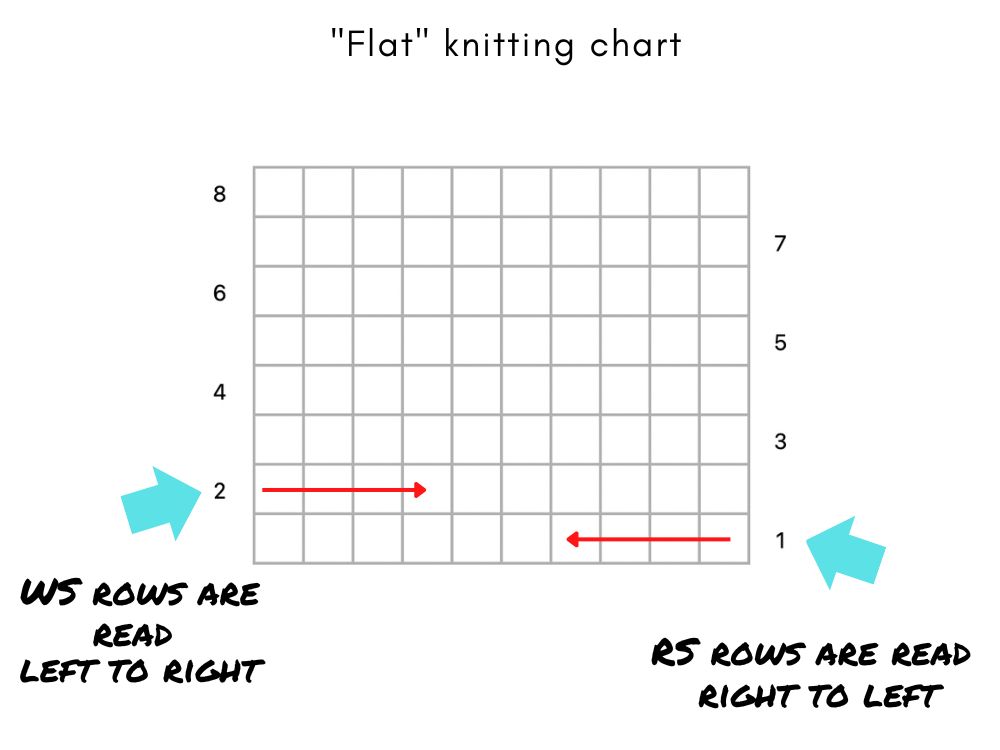
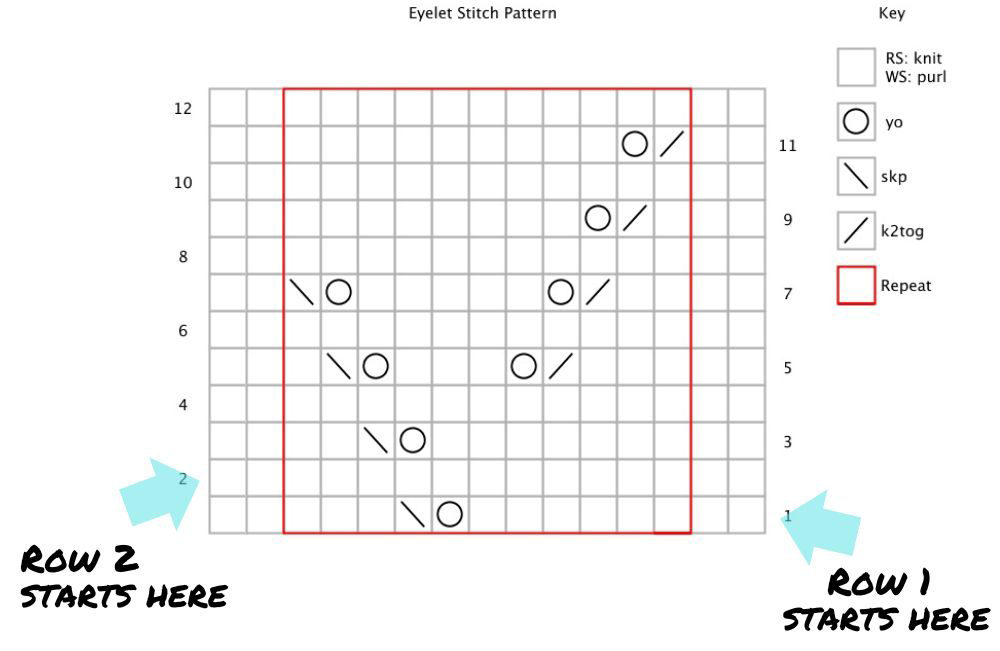
Tip #1: RS (right side) rows are always read right to left and WS (wrong side) rows are always read left to right.
When in doubt, look for where the vertical row number is listed. For example, in the blank chart below, the vertical “1” is listed on the right end of the first row – this is how you know you should start row 1 on the right end and read the row from right to left. But, the vertical “2” is listed on the left end of the second row – this is how you know you should start row 2 on the left end and read that row from left to right).
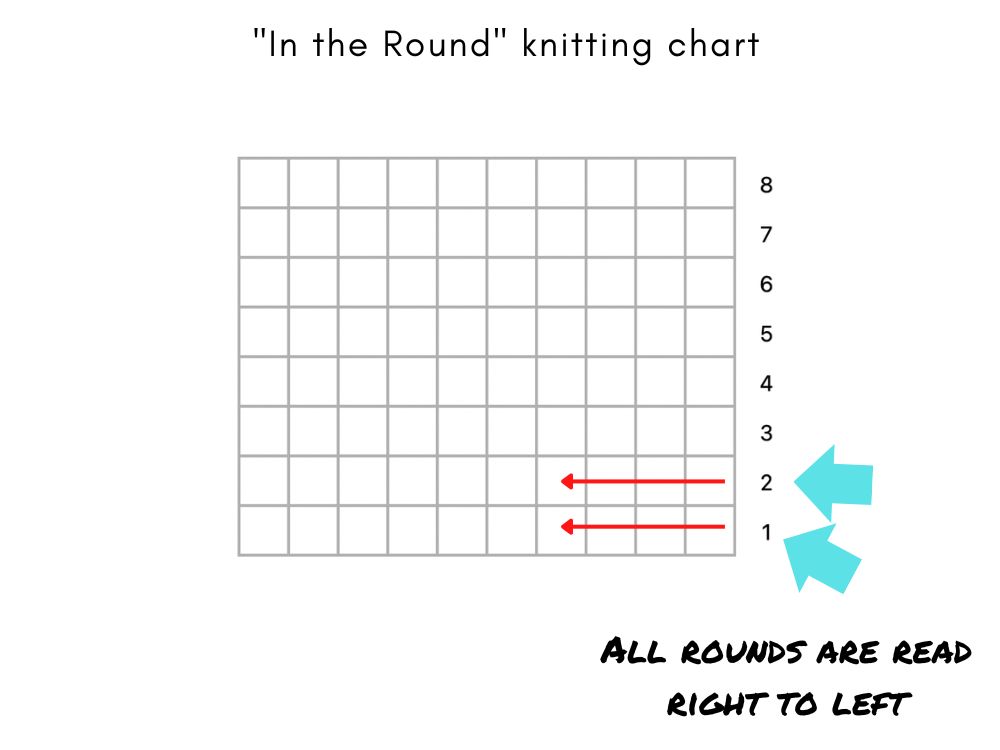
Tip #2: If you’re working in the round, there are no WS rows. So you always read your chart from right to left on every row of the chart.
As shown in the blank chart example below, if you are working in the round then you have no WS rows and so all rows begin on the right-end of the chart and are read from right to left. This is why every vertical row number is on the right-end of the chart.
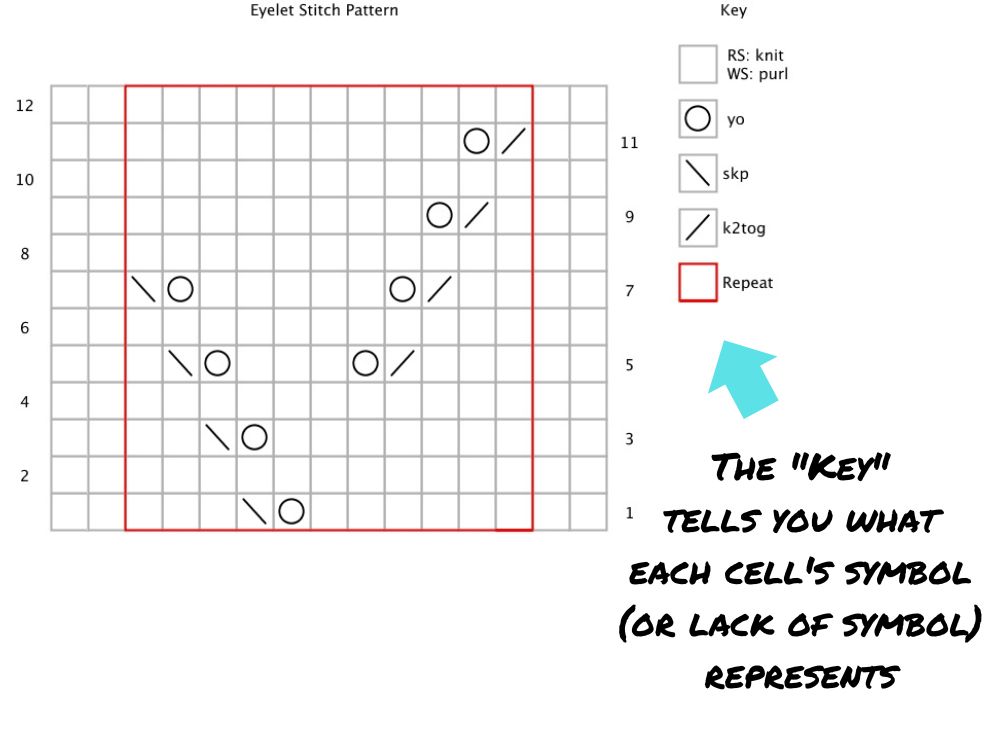
Tip #3: The key defines which symbols represent which stitches.
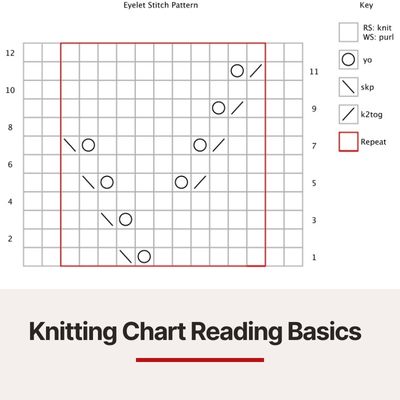
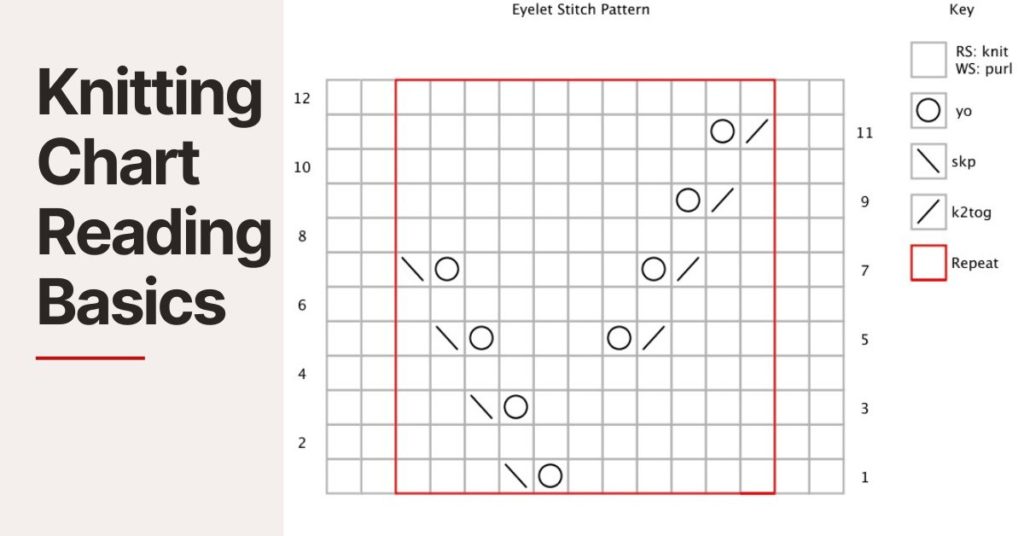
Every chart has a key and that key will define what each of the symbols (or lack of symbol) means in the chart. Let’s look at the below example. This is a pretty simple chart (used in my Salt Marsh Wrap pattern) where there are only 3 actual symbols (representing one of these 3 stitches: YO, skp, or k2tog). But it also defines that a blank cell represents a knit stitch on RS rows or a purl stitch on WS rows.
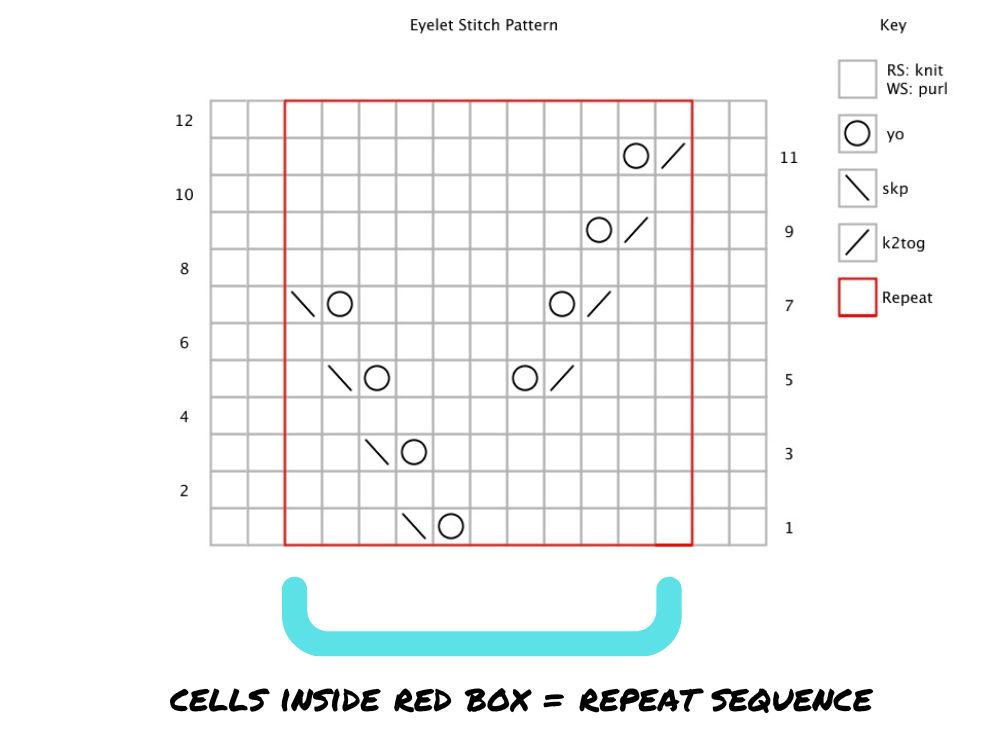
Tip #4: The cells within the red border are considered a repeat sequence.
Often in a stitch pattern you will have a section of the pattern that is repeated over and over again, either until the end of the row or until a certain number of stitches before the end (or before a marker). In a knitting chart, that repeated sequence typically has some kind of bolded line around it, or a red box as pictured below:
The best way to explain how you translate this is to show a stitch pattern written-out and then how that translates into a knitting chart. So using that same knitting chart that is referenced above (and that is featured below as well), let’s walk through the first 2 rows.
Here is the first row written out:
Row 1 (RS): k2, *k6, YO, skp, k3; rep from * to last 2 sts, k2.
Now let’s look at the chart below. Row 1 will start on the first row and at the right-end (since the vertical “1” is on the right-end). We start with 2 blank cells, so those represent 2 knit stitches (the “k2” from above). Then you enter the red bordered area – you’re now in the repeat sequence. So you have 6 more blank cells (so the “k6 from above”) followed by the circle (the “YO” from above), a left-leaning slash mark (the “skp” from above), and then 3 more blank cells (the “k3” from above). Now you’re at the end of the red bordered area – so now you will go back to the beginning of the red-bordered area and repeat everything within this area over and over again until only 2 stitches remain (this is the “rep from * to last 2 sts” from above). How do I know I repeat it until 2 sts from the end? Because I have 2 stitches left at the end of the chart row, outside of the red bordered area. That’s the “k2” at the end of the written instructions.
What about row 2? Well row 2 is a WS row and so we’ll start reading the chart from left to right (we know this because the vertical “2” is on the left end of that row in the chart. And we notice that all the cells are blank are in that row – looking at the key, a blank cell on a WS row represents a purl stitch. So we know that we just need to purl each stitch in that row.
Tip #5: Comparing written instructions to charted instructions helps in the learning process.
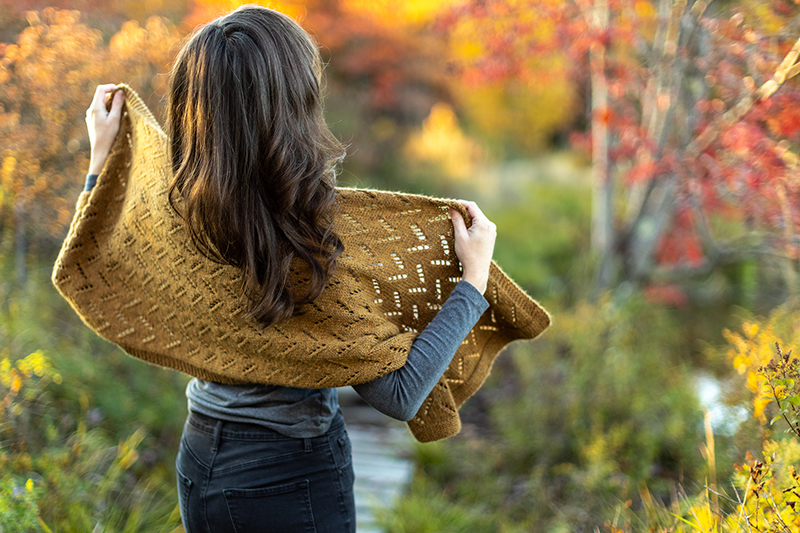
When I was first learning to read knitting charts, I’d try to find patterns that had both written stitch pattern instructions as well as charted and I would study and compare them. By reading through written instructions first and then comparing them to what I was seeing in the chart, I started to see the patterns and understand how charts really worked. If you are looking for a pattern that would be good for this, check out my Salt Marsh Wrap pattern (pictured below).
Tip #6: Use a post-it note, magnet or other device to keep track of each chart’s rows.
When following a chart, it’s super helpful to use a guide of some kind to help you know which row in the chart you’re on. A simple post-it note can do it (as pictured below), or there are pattern holders with magnets that serve as the guide (like this one from Webs as an example).
Give chart-reading a try!
Knowing how to read a knitting chart is important because, even if you decide you prefer following written instructions of a stitch pattern, some patterns only provide charts. So it’s a good skill to have in your back pocket! And, you never know – you may find you actually prefer following charts and it helps you expand your knitting skills. One of my patterns that’s a great option for first-time chart-readers is Salt Marsh Wrap (as I mentioned above) – click here to learn all about it!

