Reading a knitting pattern can be a bit like reading something in code (actually when I was first learning html coding language, I really enjoyed it because it kind of reminded me of knitting patterns!). There are abbreviations and writing techniques used to prevent a pattern from being 20 pages long (kind of like shorthand), and these writing styles can also make the pattern easier to read. But if you are a beginner, it can seem a bit overwhelming (“not only do I need to learn how to make these stitches, I need to learn how to read this new language!”). But I promise, as with all things in knitting, once you understand it and give it some practice time, you’ll definitely get the hang of it. In this post I’m going to focus on the most basic 3 areas of pattern reading: common abbreviations, the use of parenthesis, and the language used to communicate repeats.
Common Knitting Abbreviations:
Knitting patterns use abbreviations to help save space. It may not be as much of an issue today (with PDF patterns), but think about the older pattern booklets where they had to fit an entire pattern into 2 columns on one page! And even today, although you can have limitless pages in a PDF, who wants to print 20 pages (ink is expensive enough!). Using abbreviations also helps keep instructions more concise, making them easier to comprehend. So for example, instead of spelling out the entire work “knit” every time, it’s always abbreviated as just “k”. Here are some other common abbreviations:
| knitting word | abbreviation |
|---|---|
| knit | k |
| purl | p |
| cast-on | CO |
| bind-off | BO |
| right side | RS |
| wrong side | WS |
| slip | sl |
| yarn-over | YO |
| increase | inc |
| decrease | dec |
| rep | repeat |
| st | stitch |
| St st | stockinette stitch |
Some designers and companies will have their own set of other abbreviations. This is why it’s always important to review the “Abbreviations” section of a pattern before you begin.
Use of Parenthesis:
Parenthesis are used to list garment sizes. For example, my Carley vest features 7 different sizes and on the pattern information page, you’ll see the finished measurements of these sizes listed as: 35 (41, 45.75, 50.25, 55, 60, 65)”. The smallest size is always listed first and then the remaining sizes are inside the parenthesis in ascending order. This also sets the order for size-specific information in the pattern. Below are some examples. In these examples, let’s assume you are knitting the size 50.25″, which is the 4th size listed (the 3rd size in from the start of the parenthesis):
- Yardage amounts are listed as: 750 (900, 1050, 1200, 1350, 1500, 1675) yds. So for the 50.25″ size, you will need 1200 yds (the 4th number listed).
- Amount of stitches to cast-on are: CO 88 (102, 114, 126, 138, 150, 162) sts. So for the 50.25″ size, you will cast-on 126 sts (again, the 4th number listed).
- Number of times to repeat a sequence of rows: Rep Rows 1-2: until measures approx 7.5 (8, 8.5, 9, 9.5, 10, 10.5)”. So for the 50.25″ size, you will repeat rows 1-2 until measures approx 9″.
For some patterns where I have over 8 or 9 sizes, I will actually utilize 2 sets of parenthesis. This just helps to identify your particular size a bit easier because having 9 numbers in a row can look confusing and you’re more likely to miscount. But if you have 2 sets of parenthesis, it helps to break up the numbers a bit. Speaking of miscounting though, here’s a tip: before you start a pattern, take a highlighter and wherever you see instructions where numbers are given in this format, highlight the number pertaining to your size. This will make it easy to identify it as you work your way through the instructions.
Language Used to Communicate Repeats
Repeating Sequences in a Row
Repeating a sequence of stitches is very common in knitting instructions. For example, in hem ribbing you may be instructed to work a sequence of k2, p2 all along the row. This is often written in one of two ways – either using a “repeat from *” type of instruction or the use of brackets. Both are saying the same thing, but they are just saying it in different ways. Let me walk you through both options…
Option 1: use of “rep from *”
Written as: *k2, p2; rep from * to last 2 sts, k2.
Translation: You will knit 2, then purl 2, then you will repeat this sequence of k2, p2 all the way to 2 stitches before the end, and then you will knit 2. So the sequence that is being repeated is between the asterisk (*) and the semicolon (;).
So here’s the takeaway: you work the instructions in-between the asterisk and the semicolon, and then you repeat it however many times the pattern tells you to (either repeating it until the end, or repeating it once or twice, etc.).
Option 2: use of brackets [ ]
Written as: [k2, p2] to last 2 sts, k2.
Translation: You will repeat what’s in the brackets over and over again until the last 2 stitches – so that means you will k2, p2 over and over again to the last 2 stitches, then end with a knit 2.
So here’s the takeaway: you work the instructions in brackets over and over again however many times the pattern tells you to (either repeating it until the end, or repeating it once or twice, etc).
So as you can see from this example, both options are saying the exact same thing, but they are just saying it differently. Why use one way over another? There can be multiple reasons but often is just comes down to writing style.
Repeating a particular row over multiple rows
What I mean by this is if you are told to work a particular row, and then you are told to repeat that row every x amount of rows. This is often used in shaping – let me give you a sleeve shaping example from my Ramona Cardigan. In this piece, you are instructed to work a “Dec Rnd” (decrease rnd) where you decrease 2 stitches in that round. Then after you work this dec rnd, it says to:
Work in St st in the rnd, repeating above dec rnd every 16 (13, 11, 9, 8, 9) (8, 8, 7, 7, 6)th rnd 2 (5, 6, 5, 6, 5) (10, 10, 5, 6, 2) times, then every 15 (0, 0, 8, 7, 8) (0, 0, 6, 6, 5)th rnd 2 (0, 0, 3, 3, 3) (0, 0, 6, 5, 12) times.
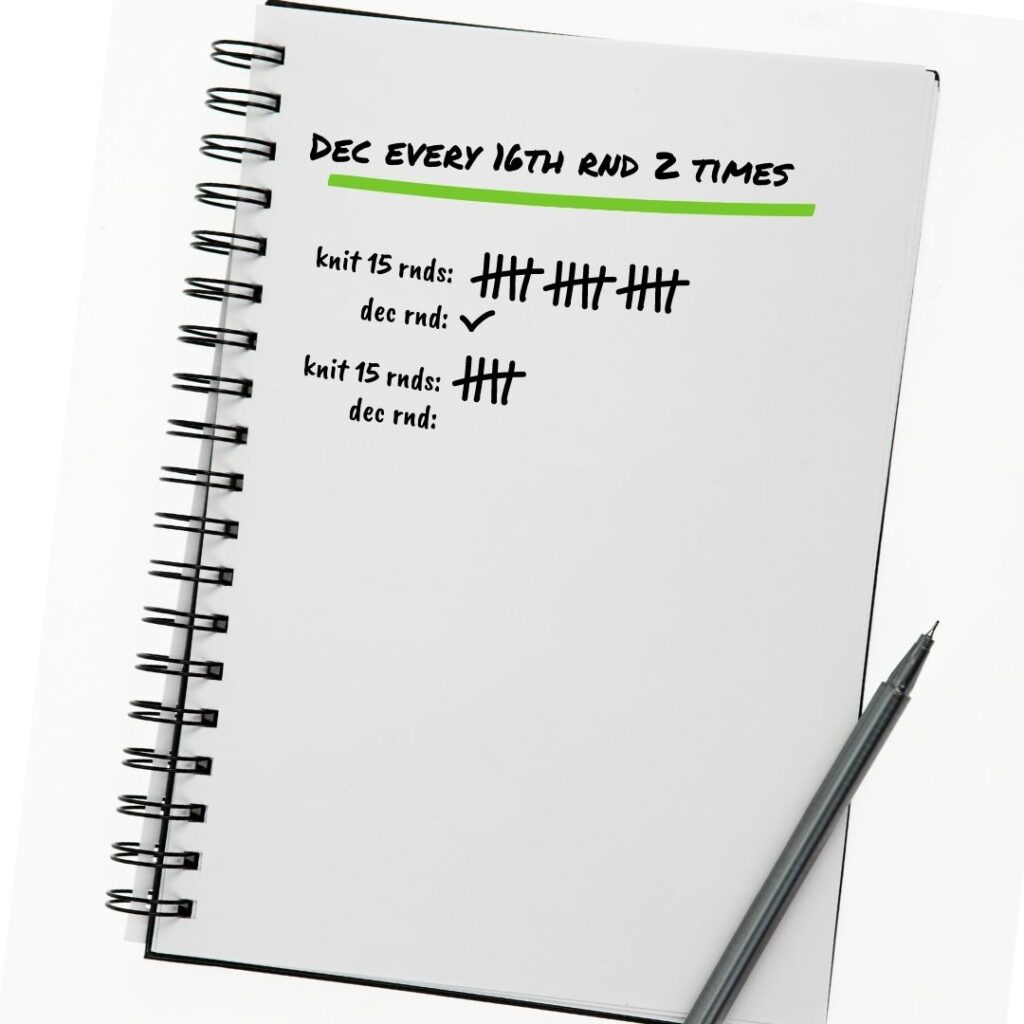
Here’s the translation: if you are told to work in Stockinette stitch, repeating a particular round every 16th round (for example), that means you will work in Stockinette stitch for 15 rounds, and then on the next round (which would be the 16th), you repeat the decrease round again.
Tip: I find the easiest way to keep track is to take notes on a piece of scrap paper. So it would look something like this:
I hope these pattern reading basics have demystified the language of knitting patterns a bit for you! If you ever have any questions about reading a knitting pattern, feel free to reach out.


