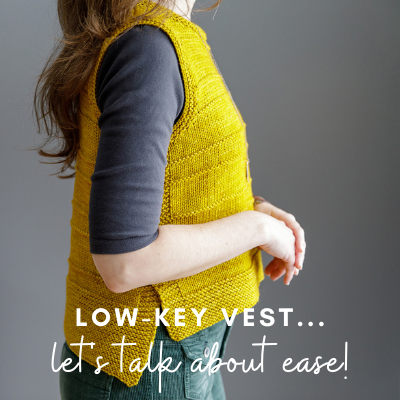

I recently released my newest design, Low-key vest! When knitting up the samples of this design (there are two versions – cropped & tunic length), I decided to knit 2 different sizes to model as a lesson in ease. Let me explain more!
In this blog post I’ll be discussing topics such as:
- What “ease” actually is.
- Actual bust circumference vs upper torso circumference as your starting point for applying ease.
- How designers decide on how much ease to suggest in a pattern.
- Learning what your preferred amount of ease is.
- How garment length (and your other circumferences) can play a part in picking a size.
1. What is “ease”?

Ease is the difference between your actual body measurement and the measurement of your finished garment. If a knitting pattern says it recommends you pick a size with 4-6″ of positive ease at the bust, that means you should pick a size whose finished garment measurement is 4-6″ larger than your actual bust measurement* (note: this is not your bra size – this is your actual measurement around your bust using a tape measure).
Ease can also be negative if a garment is meant to be very close-fitting (personally, my patterns rarely recommend negative ease but that’s only because my aesthetic is all about layers, so it’s just not my style). If you see a pattern that asks for, say, 1-2″ of negative ease, that means you should pick a size whose finished garment measurement is 1-2″ smaller than your actual bust measurement.
2. Actual Bust vs Upper Torso
Now above I say that you’re supposed to add the positive ease amount to your actual bust measurement (so your actual bust is the starting point). However, for some people (especially those who have a larger bust), using your upper torso measurement as a starting point (sometimes also referred to as “high bust”) instead of your full bust is often recommended because it can be a better indicator of your overall frame size. Below is a drawing that shows the difference between these 2 measurements:

How do you know which measurement you should be using as your starting point?
If you have knit several sweaters in the past using your full bust and picked a size based on the suggested ease listed in the pattern and your sweaters always feel too big on you, then then that can be a sign that using your upper bust circumference as a starting point might be beneficial.
In addition, I have read that those with a C-cup or larger may benefit from starting with the upper torso. Because for these bust sizes, there is a greater difference between your upper torso circumference and your actual full bust circumference – typically a 3-4″ difference. And that difference is enough that you may find, with certain construction-styles, that starting with the full bust just makes the sweater feel overly big everywhere else on your body and so upper torso is a better starting point.
What if you pick a size based on upper torso but then have no ease or negative ease at the full bust?
This is where things can get quite subjective and may also depend on construction-style, but here are some general tips about this:
- It can be ok to have 0” or even 1” or so of negative ease at the full bust because knit fabric can stretch. And so I’ve heard from bustier knitters that you shouldn’t be overly concerned with no ease at the full bust – but again, depending on the look you’re going for and the style of the sweater.
- A great way to test this concept is to measure sweaters in your closet that you love the fit of – measure across the bust area, multiple that by 2 and compare it to your actual full bust circumference. This can tell you whether you typically wear 0” or a little negative ease in your sweaters.
- For those who would have negative ease in the bust if they went with upper torso but would prefer to have some positive ease, you can make some modifications to the pattern.
Common modifications to create more fabric around the bust:
There are lots of different modifications you can consider, and they’re very much dependent on construction-style as well as your level of comfort in customizing your knits. But here are some common ones people often use for this type of modification:
- Working horizontal short rows at the full bust area
- Working vertical bust darts
- Casting-on more stitches at the underarm (in raglan styles)
- Shifting sweater so that more stitches are in the front than in the back (in round yoke styles)
3. How does a designer pick the amount of recommended ease?
There are so many factors that go into deciding on ease from the pattern designing perspective. The type of construction of the piece has a big impact – raglan or set-in sleeve constructions will typically call for 1-4″ of positive ease whereas a drop-shoulder construction typically calls for 6-12″ of positive ease (for more information about drop-shoulder ease, check out this blog post).
The weight of the yarn/density of the fabric will also impact the amount of ease a designer will suggest. But it also has to do with the particular style/look/drape the designer had in mind for the piece. Often a designer will recommend a fairly large range in terms of the amount of ease, as well as let you know how much ease the model is wearing the sample. This will give you an idea of range the designer thinks will work well, as well as let you know how much ease you would need to have a similar look as that photographed.

But how do you determine what ease might be best for you?
4. Deciding on your preferred amount of ease
One of the great things about knitting is the ability to create your own garment that’s unique to your body and your own taste. And the size you pick to knit is part of that “unique to you” experience. Everyone likes to wear their clothes differently – close-fit, oversized, or a combo of both with layers. It’s all about your own personal style.
One great way to determine what you typically like to wear your sweaters/tops? Measure the sweaters in your closet!

Although store-bought, machine-knit sweaters will drape differently than hand-made ones, it will still give you an idea of the overall widths/lengths to tend to prefer and how they compare to your actual body measurements. For more tips on finding your “preferred fit”, check out this blog post!
4. Length can play a big factor, even when deciding on width-wise ease…
Ease is often listed as the difference between garment and actual measurements of the bust. But the reality is that the bust is not always the widest circumference on your body. So when I decide on the amount of ease I want in a garment, knowing where the garment will fall length-wise is extremely important, as well as how I want it to drape on my body (fitted vs more loose). And in my pattern Low-key, I’ve demonstrated this…
Low-key version 1: cropped length, being worn in size 2…

My actual bust measurement is around 33.5″ (and my upper torso is only about 1″ smaller than this). Size 2 has a finished circumference of approx. 37-38″. So in the above photo, I’m wearing size 2 with approx. 4″ of positive ease at the bust. This works for me in the cropped length because at this length (from my natural waist up to my shoulders), my bust is my widest circumference. However, when picking a size to knit for the tunic-length version, I changed things up…
Low-key version 2: tunic length, being worn in size 3:

I wanted to show a version that had a more flow-y, oversized vibe to it, so I knit this sample in the size 3. Size 3 has a finished circumference of approx 40-41″, so compared to my actual bust I’m wearing it with 7″ of positive ease at the bust.
It feels more like a layering piece this way. Additionally, this is the tunic-length – the back will hit at the widest part of my hips. And my hips are the widest circumference on my body – they measure approx 40″ (so a good 6+” larger than my bust – I’m most definitely a pear shape!). Had I knit the size 2 in this tunic length, it would be hugging my hips (I’d have 1/2″ of negative ease at my hips). This could be fine if I wanted a more fitted, hip-hugging tunic, but I knew I wanted it to have more drape so by sizing up to size 3 I was able to get that look.
This size gives me a lot more ease in the bust, so it has that more oversized, layered look AND, because it’s tunic-length, I accounted for my hip measurement and the piece falls on my body the way I wanted it to. So there is no wrong answer here – it all just depends on the way you want the garment to fall on your body.
The more garments you knit, the more you’ll learn
There’s nothing like first-hand experience. It might mean that there’s a learning curve and not every garment you knit you’ll be 100% happy with, but with each garment you knit you’ll learn more and more about the size and style that you like best. With time, you’ll feel more confident about picking your size and making alterations as needed so you have a finished garment that’s made just for your unique body!
My ease recommendations can be different depending on the pattern, so feel free to reach out if you ever have any questions about picking a size for any of my designs!
For Further Reading about Ease & Sizing…
Check out these additional blog posts I’ve written about this subject!


