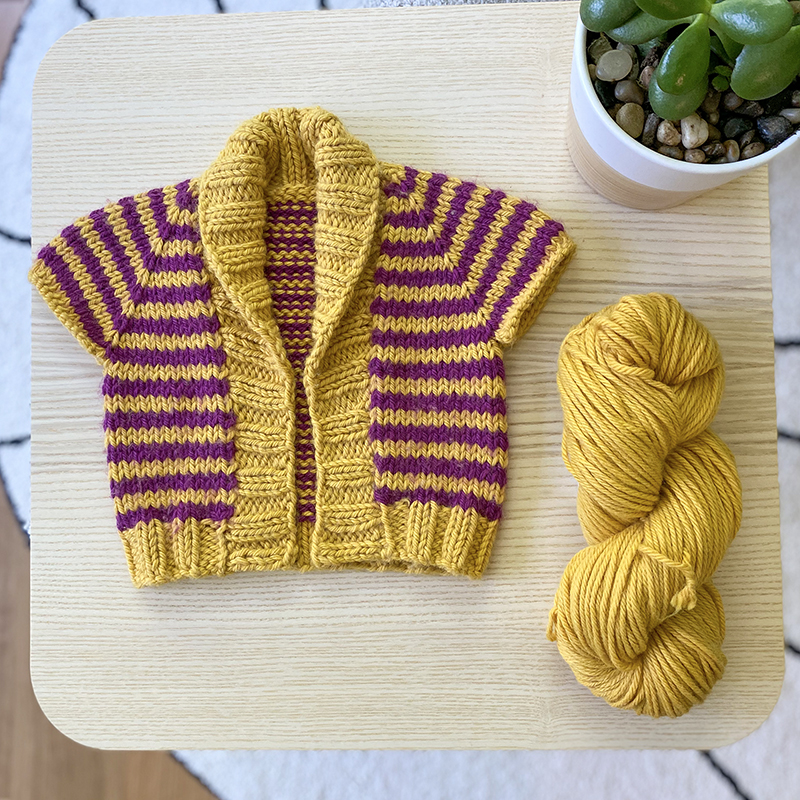
In this tutorial, I’m going to explain how I create a shawl collar in 2×2 rib front bands (2×2 = k2, p2), using my Arlo & Alice baby/child cardigan vest as my example (design shown below!):

The goal with a shawl collar is to gradually add more fabric (i.e, rows) from around the center of each front to the back of the neck. This is easily attained with short rows! By working back and forth on either side of the neck, gradually working more and more stitches on each side (via short rows), you create a curve of extra depth which gives you the shawl collar style. The image below shows this extra fabric around the neck:

Below is an outline of how I work this technique in the Arlo & Alice design. The technique is similar with my other shawl collar designs Freeport or Abbi (with just slight variations). If you want to take this technique and apply it to your own design or project you are adapting, just keep in mind that the project’s neckline must either be v-neck or have no shaping (the fronts just come straight down from the shoulder).
Step 1: Picking Up Stitches
First step is to pick up the number of stitches along the right front, around the neck and down the left front as specified in your pattern. What’s really important in this step is the number multiple that your pattern tells you. Since I’m using Arlo & Alice as my example so I will use the numbers that I provided for this design. But my other shawl collar designs may be a little different so just make sure to follow what the pattern says.
- Starting at the bottom of the right front (remembering that “right” and “left” are from the perspective of wearing the garment, not looking at it), join yarn and pick up and knit approx. 3 stitches for every 4 rows up the right front – all the way to the top. Make sure the number of stitches you have picked up is a multiple of 4! Then place a marker on your right needle.
- Now you want to pick up and knit into each of your cast-on stitches around the neck (so your front, sleeve and back neck cast-ons) – in Arlo & Alice this number is also a multiple of 4. Then place a marker on your right needle.
- Then you will pick up and knit approx 3 sts for every 4 rows down the left front to the hem, but make sure you pick up 2 stitches more than you did for the right front. Will this make your piece lop-sided? Not really – 2 stitches is not enough to cause a dramatic visual difference in this particular piece. So you now have 2 markers placed on your needles, on either side of the neck stitches.
Step 2: Start Working your Short Rows
Below I have explained how to establish your short rows, but I also have videos on YouTube that will be helpful. But because we are working in k2, p2 ribbing and not stockinette stitch, the video isn’t the exact same scenario. However, when watching the video, pay attention to how the short rows are worked on WS rows – this is the same w&t technique as I use below.
- Your very first row will be a WS row and the first part of that row instructs you to p2, *k2, p2; rep from * to 4 sts past the furthest marker – so after the first “p2”, you’ll work the “k2, p2” sequence up the left front and around the neck stitches (passing the first marker you reach – just slip it from left needle to right needle as you reach it). But then when you get to the second marker (the further of the 2), you will work 4 more stitches – so k2, p2.
- The last part of that row’s instruction is to w&t wyif – that stands for “wrap and turn with yarn in front”. So since your last stitch was a purl stitch, your yarn is already in the front – keep it there. Then slip the next stitch from left needle to right needle (as if to purl), bring your yarn to the back of the work (in-between the 2 needles), return the slipped stitch to the left needle, and bring your yarn to the front of the work. Then turn your work, so you’re ready to work the next row. This excerpt from my w&t video below will show this step (note: the video shows stockinette stitch, but the technique at this step is the same. To watch the full video, click here.):
- Then you move onto the next row (which is a RS row) and are instructed to *k2, p2; rep from * to 4 sts past the furthest marker again – so you’ll slip the first marker you encounter and work your way to 4 stitches past the second marker just as you did in the first row (except now you’re on the other side of the garment).
- Then starting with the third row, the instructions say to work to 8 stitches past the furthest marker, knitting wrap as you reach it, and then w&t wyif. So you’ll work the same as you did for row 1, except once you get to the further marker (the second one), you will work 8 stitches (not 4), and when you get to the stitch that was wrapped on row 1, you will need to knit the wrap with the stitch. What that will look like is this: once you get to that second marker, you will k2, p2, and then the next stitch is the wrapped one so that’s the one you will insert your right needle into the wrap, and then into the stitch itself and knit them together, then you will k the next stitch, then p2, then work your w&t wyif as instructed. To see how you knit a wrap, watch this excerpt from my video below (note: again, this video shows stockinette stitch, but the technique at this step is the same. To watch the full video, click here.):
Step 3: Continue Short Rows as Established
- You will continue in this manner, always working 4 stitches more past the furthest marker and then working your w&t, until the pattern tells you to stop, or until your happy with the width of your shawl collar. The more short rows you work the deeper the collar will be!
Step 4: Short Rows Completed and Work Regular Rib Stitch Back-and-Forth
- Once you are done with your short rows, you’ll just work in your rib stitch from beginning to end of row for the specified number of rows, or until the ribbing is the appropriate width at the hem.
- To complete, I always bind-off in pattern – so in rib stitch that means you will bind off in the same k2, p2 pattern.
I hope this tutorial has been helpful in providing more in-depth understanding of how to use short rows to create a shawl collar! If you have any questions, feel free to reach out to me.

