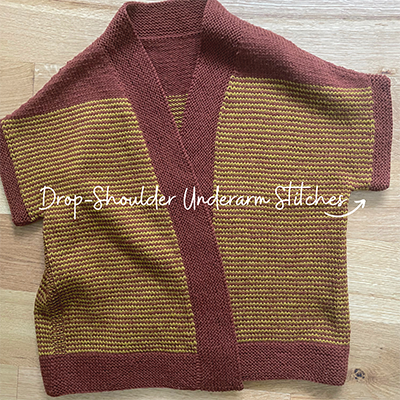
In today’s blog post, I’ll be sharing some visuals of a technique that I’ve been using for a little while in my seamless knitting when working on modified drop-shoulder garments (using my Layla cardigan as my example in the photos).

What’s a drop-shoulder? In sleeve styles, a drop-shoulder is when the body of the garment is a big rectangle with little to no shaping, from hem all the way to the shoulder. The sleeve has no shaping – the sleeve line comes straight down from the shoulder. This makes for an easy sleeve to knit because you just need to pick up stitches in an easy vertical line on either side of the garment.

In a modified drop-shoulder, you cast-on some stitches on either side of the body at the underarm – the sleeve seam line still comes straight down, but further out from the body. I like the modified version of the drop-shoulder because it allows you to control a bit more where the sleeve line appears and you can create a more flattering shape. I first started working this technique when working on designs with Quince & Co, so you’ll often see this type of construction in their seamless bottom-up pieces (such as Pam Allen’s fabulous Plain & Simple book – I’m a huge fan of Pam’s work!).
So let’s get to the technique of creating this modified drop-shoulder sleeve!
In a modified drop-shoulder sleeve, you work the garment body in one-piece from the bottom-up. At the underarms, you split the front and back, typically working the front first while your back stitches are put on a holder or piece of scrap yarn. For the front, you’ll be instructed to cast-on a certain number of stitches at the beginning of the first 2 rows. In my Layla cardigan, I instruct to cast-on 5 stitches on each side. And often, you’ll be instructed to cast-on these stitches using the cable cast-on technique. This type of cast-on is pretty sturdy so it makes for a good underarm cast-on. I have a video on my YouTube channel if you need some help with this!
Then, after the front is all worked up and it’s time to move forward with the back, you’ll be instructed to transfer your back stitches to the circular needle and, instead of casting-on stitches in your first 2 rows like you did on the front, you’ll instead pick up and knit into the underarm stitches you cast-on for the front. I know, sounds a bit confusing – so let me show you some visuals that might help. Below is both a video lesson of me working this technique in my Azalea top as well as a photo tutorial of me working it in my Layla cardigan.
Video Lesson:
Photo Tutorial:
In my Layla cardi, I inserted my right needle into the furthest underarm cast-on stitch from the front, as in image A below:

After you pick it up, then you’ll join yarn (making sure to leave a decent length tail) and knit it. You’ll then pick up and knit into each of the rest of the underarm cast-on stitches, so it will then look like the below image B:

Then you will go ahead and knit all of the back stitches to the end of that row (or follow instructions in your particular pattern). Sometimes you may find that a gap appears at this junction, when you go from picking up underarm stitches to knitting the back stitches – not to worry! You can cinch it up later when you weave in your ends, or some patterns may actually provide some other techniques that help alleviate the hole (such as in my Azul tee from Quince). When you get to the end of the row, don’t turn the work yet. Instead, you will pick up and knit into each of the left-side front underarm stitches – see image C below:

Similar to the other side, don’t worry if you get a little hole – it can be cinched up later (or follow instructions in your particular pattern). Then you’re done! You can turn your work and follow the rest of the instructions as written.
So why all of this? Well because you picked up and knit the underarm stitches, you won’t have to do any underarm seaming at the end! And now that you have a visual of what this technique is about, I hope it helps clarify things a bit more! Feel free to reach out to me if you have any follow-up questions.


