Ramona Tips
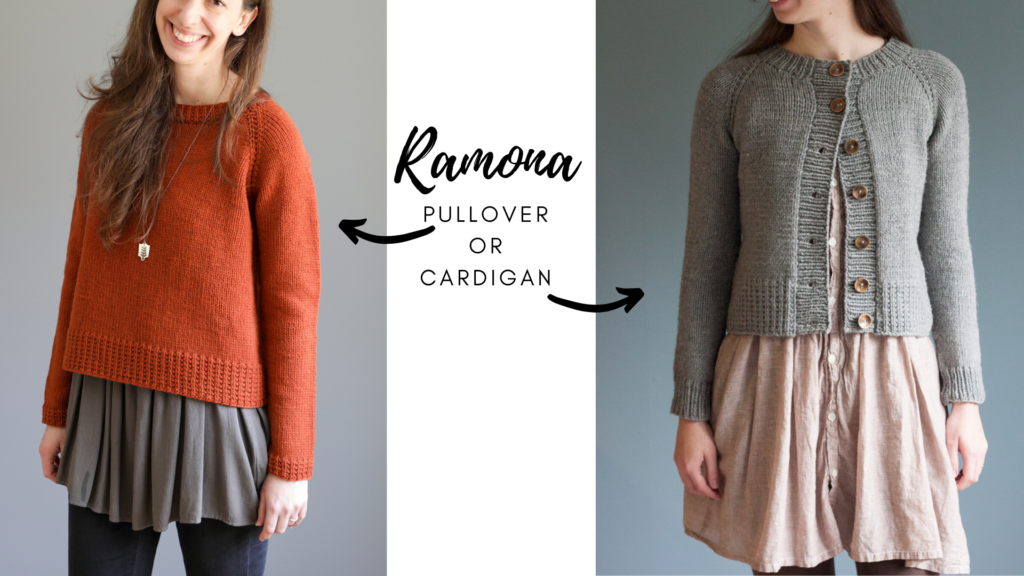
Whether you’re knitting the Ramona Cardigan or Ramona Pullover, the tips below might be helpful as you make your own Ramona! Below are the topics I cover on this page. Also, if you would like some Ramona inspiration, check out my “Behind the Design” blog post series about this design here.
- Picking a size
- Gauge swatching
- Top-down raglan shaping basics
- Pullover-version: joining to work in the round
- Cardigan-version: shaping neckline tips
- Adjusting armhole depth
- Adjusting width
- Underarm Divide tips
- Cardigan-version: making it A-line
- Working the sleeves (DPNs or Magic-Loop!)
- Picking-up neckline stitches
- Cardigan-version: working the buttonband
- General Technique Tutorials:
- long-tail cast-on
- m1-R and m1-L
- knitted-on cast-on
- ssk and k2tog
- blocking
Picking a Size
In most of my top-down sweater patterns I suggest picking a size that is approx. 2-5″ larger than your actual bust measurement. But it really comes down to your personal preference – if you want a more fitted look then go with less or for a more oversized look go with more! I talk a lot about ease in this blog post and so it may be helpful to you!
For reference, in the pattern photographs, I am wearing the Ramona Cardigan with about 2″ of positive ease and the Ramona Pullover with about 5″ of positive ease.
Another tip is this: measure not only your actual full bust but also measure your upper torso/high bust (at your underarms). For some people, using this as your starting point may be best because it’s a better indicator of your overall frame size (especially true if your upper bust is 3″+ larger than your actual bust). If this is the case, you could always cast-on for a smaller size and then make adjustments in your raglan shaping/underarm cast-on (in the “Underarm Divide”) to gain extra width. I talk more about this below (in “Adjusting Width”) but you can also send me an email if you would like additional advice for your particular situation.
Gauge Swatching
It’s important to swatch before you start, because just because I used a particular needle size to get gauge doesn’t mean that you will! Everyone’s tension can be a little different, and it also depends on your chosen yarn. Need some basic swatching tips? Check out my page here – it was a tutorial for my Audrey’s Cardigan but the techniques I use for swatching are similar. Important note: if you are making the Ramona Pullover, you should swatch in the round. Why? Although you start the pullover flat (to shape the neckline), most of the yoke and all of the body is worked in the round and so swatching in the round will provide you the most accurate gauge. Learn more about this (as well as a video tutorial) by clicking here.
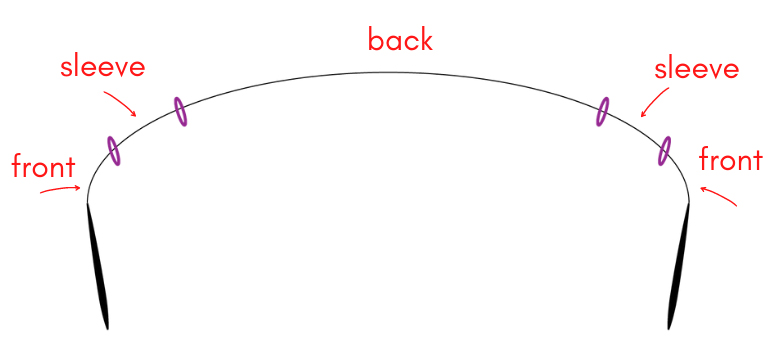
Top-down raglan shaping basics
If you are new to top-down raglan sweaters, I recommend checking out this page. It provides an overview of top-down construction, including links to videos of every step of making a top-down raglan sweater (using my Audrey’s Cardigan as the example, but the techniques are the same regardless of design). Included on that page is a tutorial to the underarm divide which can be very helpful if this is your first top-down raglan sweater.
Pullover Version: Joining to work in the round
When working on the Ramona Pullover, you start just like the cardigan working flat and back and forth. But after the neck shaping is complete, you will cast-on stitches for your front center (so the base of your crew neck front), and then follow some steps to begin working in the round. This involves slipping stitches and creating a BOR (beginning of round) marker (this happens in steps 1-3 of the “Joining Row”.
Cardigan Version: Shaping the Neckline
Here are some tips for working the Raglan & Neck Shaping sections 1 & 2 of the cardigan:
- In section 1, row 3, it starts by saying “kfb, *k to 1 st before marker…”. The first time you work row 3, because you only have 2 stitches for the Front, this means you will kfb and then because you are already 1 st before the marker, there are no additional stitches to knit. You will just move to the next marker of the instruction which is “m1-R, k1…”. And the same goes for the end of that row. After working rows 3 & 4 the first time, you’re then instructed to repeat rows 3 & 4 multiple times (depending on your size) and so then moving forward, that instuction makes a bit more sense (because you’ll actually have stitches to knit before you get to 1 stitch before the first marker).
- In section 2, you’re instructed to CO 2 sts at the beginning of the first 2 rows. In the pattern I say to use the knitted-on cast-on for the RS row and the purled-on cast-on for the WS row. You can substitute both of these for the cable CO if you prefer. Or, if you have a hard time with the purled-on CO you can just use the knitted-on CO in its place. Because stitches will be picked-up and knit around the neckline at the end, it’s not super important that you use the exact same type of CO as specified in the pattern (i.e, once things are picked-up later you won’t notice it).
Adjusting armhole depth
A common question I get is what to do if you want to add more depth to your yoke area/armhole depth but not add any additional width. It’s simple! After all of the raglan shaping is complete, before moving on to the Underarm Divide section simply continue working as established (just without the m1 increases) until you’re happy with the depth.
Adjust Width
The great thing with top-down raglan sweaters like Ramona is that you can customizing your fit can be done fairly easily. Additional stitches can be added/removed to the fronts and back or the sleeves (or both) in order to get a fit that works best for you. A common scenario where this is done is when someone is in-between 2 sizes and decides to cast-on for a smaller size but wants to have the width at the bust be that of the larger size. If you want to do this, I’d suggest adding the additional stitches in one of two places:
- One option is to increase your raglan depth and simply work more raglan increase rows/rounds in order to get to your desired pre-Underarm Divide stitch count.
- Another option, should you not want to increase your armhole depth, is to add more stitches to your underarm cast-on (during the Underarm Divide).
Because there could be some many different possible scenarios dependent on your particular situation, if you want to make adjustments but aren’t sure what to do exactly, just send me an email!
If adjustments are made and they happen to not match up exactly with any of the stitch counts listed in the pattern, here are some tips:
- For the Ramona Cardigan: The key is that before you begin the “Bottom Ribbing” section that the stitch count for each front is an even number and the stitch count your back is an odd number (not including your side ‘seam’ stitches).
- For the Ramona Pullover: The key is that before you begin the “Bottom Ribbing” section that the stitch count for the front/back is an odd number.
Underarm Divide Tips
Note: In version 1.0 of the pullover (if purchased before 2/20/23), in step 1 of the Underarm Divide says to “Break yarn, remove BOR marker from RN, sl 1 st from LN to RN, rejoin yarn, etc.”. Is breaking the yarn really necessary? Not really. So feel free to not break it and instead, just remove BOR, sl1, and then continue with instruction. Just make sure to not pull the yarn too tightly behind that stitch you slip. In version 1.1 of the pattern I omitted this so you can disregard if you have this updated version of the pattern.
For both versions, if you would like a tutorial of this whole process, check out my page here. I also have a video tutorial linked below – it was for my Audrey’s Cardigan pattern but the techniques I use are very similar to that of Ramona. The biggest difference is that for Ramona I use the “knitted-on cast-on” for the underarm stitches whereas in Audrey I use the cable cast-on. Either are interchangeable so feel free to use the cable cast-on like in the video.
Cardigan Version: Making it A-line
In the pullover version, I provide instructions for how to make your Ramona’s body A-line shaped. But in the cardigan the instructions are only for waist-shaping and no-shaping. However, making your Ramona Cardigan an A-line shape is very doable! To make your hip circumference approx. 3″ larger than your bust circumference, you can follow the instructions below. If you want to make your hip circumference larger, send me an email and I can help you figure this out.
- Work rows 1-11 in the “Body” section as instructed.
- Then work an increase row as follows: *k to 1 st before marker, m1-L, k1, sm, k1, sm, k1, m1-R; rep from * 1 more time, then k to end – 4 sts inc’d (1 st each front/2 sts on back).
- Stitch count at this point:
- Each Front: 28 (30, 33, 36, 38, 40) (44, 47, 50, 53, 57)
- Back: 64 (68, 74, 80, 84, 88) (96, 102, 108, 114, 122)
- Then you will work in St st as established (making sure to always knit that side ‘seam stitch’ on RS & WS rows), repeating the above increase row every 18th row 2 more times.
- Stitch count at this point:
- Each Front: 30 (32, 35, 38, 40, 42) (46, 49, 52, 55, 59)
- Back: 68 (72, 78, 84, 88, 92) (100, 106, 112, 118, 126)
- Stitch count at this point:
- Continue in St st as established (again making sure to always knit that side ‘seam stitch’ on RS & WS rows) until body meas approx 9.5″, or 3″ less than your desired length.
- Go back to the pattern and at the bottom of the first column on page 4, find the “last row” instruction. You don’t want to pay attention to the sizing labels because they’re no longer relevant since your stitch count is different. Sizes 1, 2, 4, 5, 6, 7, & 9 should follow the second bulleted instruction and sizes 3, 8, 10 & 11 should follow the first bulleted instruction (note: when working the m1 on the back, just work it approx. halfway across). This will then ensure that you have an even number of sts for your fronts and an odd number for your back. You can now proceed with the pattern’s “Bottom Ribbing” section,
Working the sleeves
New to top-down raglan construction? If so, then the process of starting the sleeves may be confusing. If so, I have two videos that may be helpful. Similar to the Underarm Divide, it’s for my Audrey’s Cardigan but since it’s the same type of construction the information will be the same as for Ramona.
You’re instructed to use DPNs because a 16″ circular will, for most sizes, become too tight as you work your decreases. The video below shows you how to get started on the sleeves using DPNs:
Don’t want to use DPNs? You have options! You can try using a 9″ or 12″ length circular instead as one option. Personally I have found this length too uncomfortable for my hands, but I know many people who love working with them. So it’s just personal preference! Alternatively, you can try the Magic Loop method. This is my preferred method. And in the video below I show you how it’s worked (again, using my Audrey’s Cardigan as the example):
Picking up neckline stitches
If you need some help picking up stitches around your neck, my tutorial below may be helpful. It was for my Soundtrack Top, but the steps involved are very similar:
Cardigan-version: Working the buttonband
To create the button bands in the cardigan versions you will need to pick up and knit stitches along each front edge. You can view my tutorials about this process here.
Speaking of button bands, want a tutorial on attaching the buttons? Check out my tutorial page here.
Technique Tutorials
Below are tutorials for other techniques used in the Ramona patterns:

