Shoulder Shaping in Azalea
Once you have worked your armhole depth for your Front (all of the instructions on page 4), it’s time to move on to page 5 and the “Shape Front Neck and Shoulders” section! Your shoulders are shaped using wrap and turn short rows. For more details about what shoulder shaping is all about (and why short rows are used), you can read my blog post here. In the first 9 rows of this section you will just be working shoulder shaping (i.e, short rows) and ignoring the 2 markers that had previously been placed for your neck shaping (just slip them when you encounter them).
Here are some tips as you get started on these short rows (and keep scrolling for my video tutorial that walks you through the first few rows!).
Tip #1: Don’t worry about alternating skeins anymore
If you had been alternating skeins with hand-dyed yarns, don’t worry about continuing doing this while you work your short rows. It will only be for a couple of inches, plus you’re now working in Garter stitch so the texture has changed and so any variations in color (compared to your stockinette stitch body) won’t be as noticable.
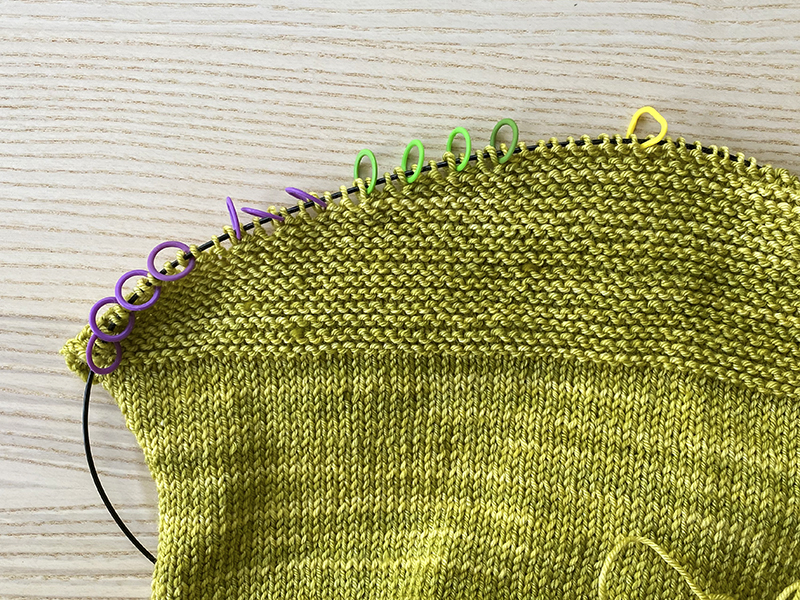
Tip #2: Use stitch markers to marker each wrap & turn
Sometimes the trickiest thing with wrap and turn short rows is being able to see where your wrapped stitches are. But if you place a marker after each “wrap and turn”, you won’t have to worry about that. Below is a picture of what it would look like if you marked each wrap (and I do demonstrate how to add a marker in this manner in the video below too):
Tip #3: Do you need to knit the wraps, or not?
So looking ahead a bit, at the end of all of the short rows you’ll be instructed to knit the wraps as you reach them. If you are a bit more experienced with short rows, you may know that when it comes to working wrap and turn short rows in garter stitch that you don’t always have to knit the wraps when you reach them (when all the short rows are done). This is because the wraps can often appear hidden in the garter ridges. For me, the decision to knit my wraps or not all depends on the yarn I’m using and the tension of the fabric. Sometimes I find it looks better to knit the wraps and sometimes I find it makes little difference. When working on this design with Feliz, I personally preferred how it looked when I knit the wraps. But, it’s totally personal preference so if you are more experienced with short rows you can try not knitting the wraps and see how it looks to you and worst case scenario, you can tink back and re-do the row (and decide to knit the wraps).
Watch my video demo!
In the below video I walk you through how I work these wrap and turn short rows. Please note that the beginning of the video to the 7:40 mark is all about working the wrap and turns, and then from 7:40 to the end I show you how to knit the wraps as you reach them – you won’t need to do this until the last rows of the Right and Left Front, so you can either chose to watch the end of the video now or save for later.
For the Front, after the first 9 rows in the “Shape Front Neck and Shoulders” sections, you will then work on your neck shaping and work both neck shaping and shoulder shaping at the same time. Click here to read my tutorial page about the neck shaping techniques used.


