Do you want to be a test knitter?
Are you interested in being a test/preview knitter for Elizabeth Smith Knits? I’d love to have you! Below are all the details about what test knitting is all about, what I look for in my test/preview knitters, and how to be notified about future test knitting calls. Each designer’s test knitting process is different, so this page will explain test/preview knitting from my perspective and how the process currently works for me.
What is test/preview knitting all about?
Being a test or preview knitter for a designer means that you get the chance to knit a brand new design before it’s ever released to the public. Test knitters “preview” the pattern and provide input to the designer about the pattern writing style, ease of instructions, and overall fit of the garment. They also provide photographs of the finished garment and post them online (or provide to the designer) so that future knitters can see how the garment looks in a variety of sizes, yarns and colors. A deadline is provided by the designer so the test knitter must complete the design and provide their input in a particular time frame. If you would like an opportunity to be an insider in the knitting design launch process, then being a test/preview knitter may be right up your alley!
Is test/preview knitting for me?
Here are some general qualifications I have for my test/preview knitters:
- Some garment knitting experience. Beginners are welcome but you should have some experience knitting at least a couple of sweaters.
- Comfortable with the given target deadline. Most of my test knits are given 6-8 weeks to complete. I completely understand if things come up though (as can happen in life!), so no one should ever stress about deadlines when it comes to my test knitting! But when starting a test knit you should at least feel comfortable at that time that you can finish the garment in the given timeframe. I just ask my testers that if they don’t think they’ll make the deadline after all just to keep me in the loop and let me know.
- Enjoy providing input. As a test/preview knitter, your opinion and experience with my pattern instructions is very important! If you stumble in any areas of the pattern, discover any errors or grammatical issues, or feel there are areas that could be written or explained more clearly, I definitely want to know so that I can make the pattern as great as possible. I also ask that you provide me with the amount of yardage you used at the end.
- Comfortable taking photos and having them posted online (along with other size/yarn details). One of the important parts of preview knitting is being able to take photos of your garments (ideally on you or another person so that others can see the fit) and then sharing these photos with me. I will then share these photos on my website, newsletter and other social channels.
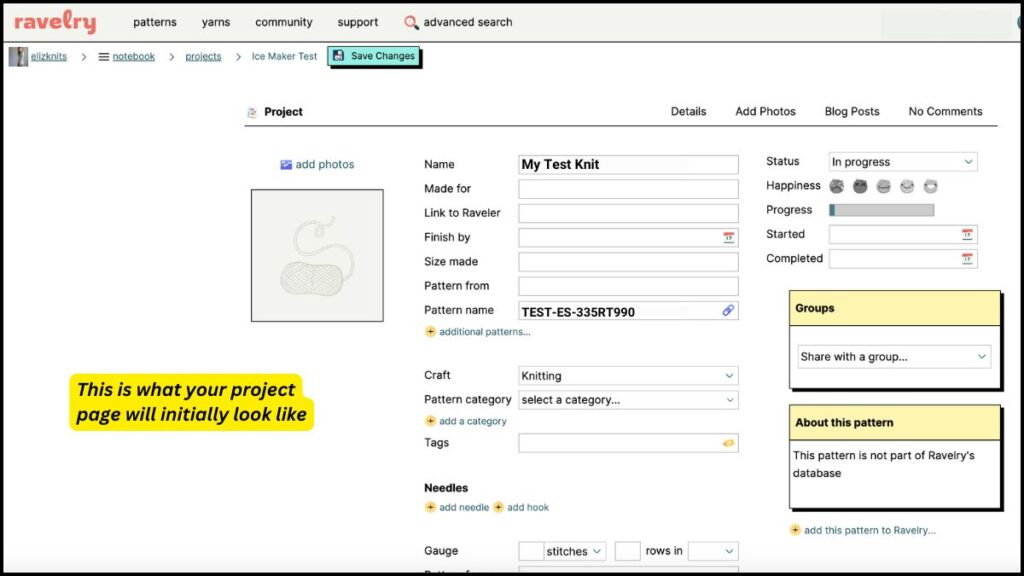
- I ask that you create a project page on Ravelry during the test knitting (I provide you with a code to use for the “pattern name” when you set-up the project page) so that you can keep all of your notes regarding size, yarn, needles, etc and post your photos. I also request that final photos are posted by the target deadline date along with details such as total yardage used, needle size, etc. If you are new to adding project pages on Ravelry, scroll below (under FAQ’s) for a photo tutorial of how you do this for your test knit project.
Test/Preview Knitting FAQ’s:
Here are some frequently asked questions about my test/preview knitting and the process…
What’s a “test knitting call”?
A test knitting call is when a new design is ready for test knitters and the information about the test knit is being publicly announced so that those interested in being testers can apply to join the test. A call will list all of the details you would want to know before applying to be a tester on the project, such as preliminary photos of the design, target deadline, sizes, yarn and yardage, gauge, etc.
How do I get notified of new test knitting calls?
If you want to be the first to know about future test knitting calls, fill out my contact form or send me an email and I will add you to my test/preview knitting email list!
Do I have to be an expert knitter?
Absolutely not! I like to have test knitters of all different levels. Your input and photographs, regardless of how you would classify yourself in terms of experience, is so very valuable.
Do I have to use a certain brand of yarn?
Nope! You can use whatever yarn you like, so long as it follows any requirements of the pattern (i.e, same yarn weight as suggested yarn and able to get the right gauge). I will often provide alternative yarn options to my testers as well that will help in deciding what yarn to use.
Do I have to apply to be a tester?
Yes, because each test knit may have slightly different requirements, each test knit call will provide instructions on how to apply to be a tester for that particular test. In the call I will ask you to provide what size you are interested in knitting as I try to make sure all sizes are represented in the test. I try to keep my test knits to a certain number of members so sometimes I am not able to take everyone who is interested. That is not a reflection on you as a knitter! Likely it’s just because there are too many people who applied for a particular size and there are only so many testers I can have in one test knit.
How important is posting finished photos?
Posting finished photos and sharing them with me is probably one of the most important parts of being a test/preview knitter because it will help others: visualize the design, provide inspiration, and show them that others have successfully knit the design (so they can too!). Your photos do not have to be professional by any means! Phone cameras are great and usually all you need to create a great photo is to have natural light. Click here to read my blog post with tips on taking photos!
Do I get anything for being a tester (other than the pattern?)
In addition to getting a free copy of the pattern you will receive an additional 2 free patterns from my store once your input and photos are provided.
What if I can’t make the target deadline?
Life happens and I totally get it! If you are picked to be a tester and you feel comfortable with the deadline, but then something with life, family or work unexpectedly comes up, just let me know and keep me in the loop. Knitting should be the thing that brings you joy, not stress – so just be communicative with me if life throws you a curve ball.
Can I share in-progress photos online?
Yes! If you are one of my preview knitters, feel free to post in-progress photos on Instagram, Facebook, your blog, etc. If you post on Instagram, make sure to tag me (@elizabethsmithknits) and use the hashtag #elizabethsmithknits
How should I provide input as I test knit?
As you are test knitting, if you encounter any errors please let me know immediately. For all other input (such as pattern reading clarity, layout change suggestions, etc.), you can either send it to me as it comes up or collect your notes and send it to me in intervals. Or you can wait until you are completely done and include your notes in the questionnaire I send out at the end of the test knit. Whatever works best for you!
Does test knitting sound fun to you?
If you’re interested in being one of my test/preview knitters in the future, fill out my contact form and I can add you to my test email list. In this message, please also send along your Ravelry username (so I can see some of your finished work)!
Creating test knit project pages on Ravelry
Taking nice finished photos is so important to a test knit but posting them is the next part of this process! Designers (myself included) will ask you to create a project page for your test knit. If you’ve never created a test knitting project page on Ravelry, check out this step-by-step tutorial:
Step 1: Create your test knitting project page
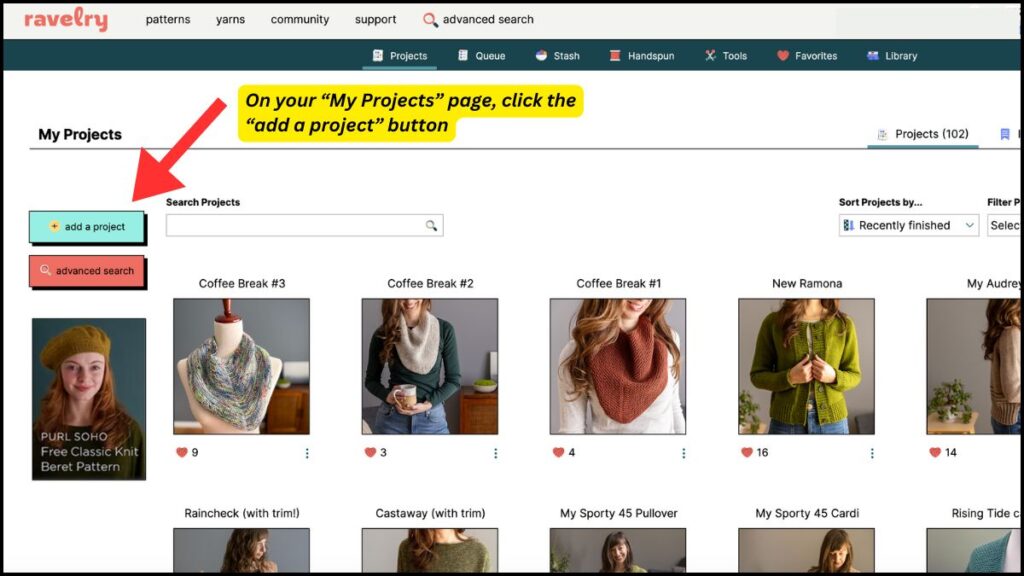
Under “My Notebook”, click on “My Projects” and then click “Add a project”:
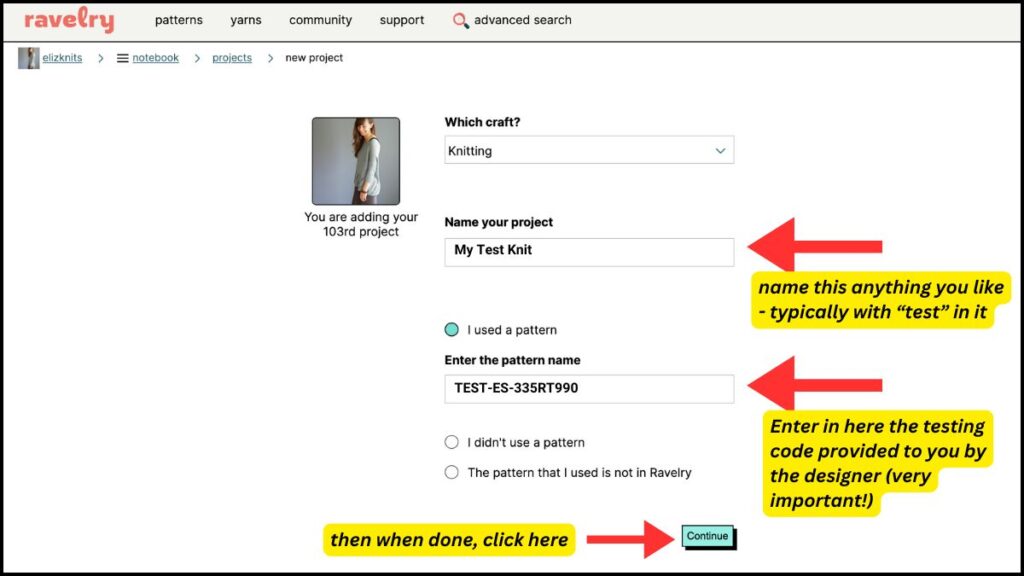
Then you’ll be prompted to provide a project name and a pattern name. In the “Name your Project” field, this can be any name you like – typcically it’s the pattern name plus the words “test knit”. The most important field is the “Enter the pattern name” field – here is where you paste (or type) the code provided to you by the designer. This is very important because this code is what will tie your project to the pattern when it becomes published later on.
Once you click that “continue” button, you’ll have your project page!
Step 2: Populate your test knitting project page
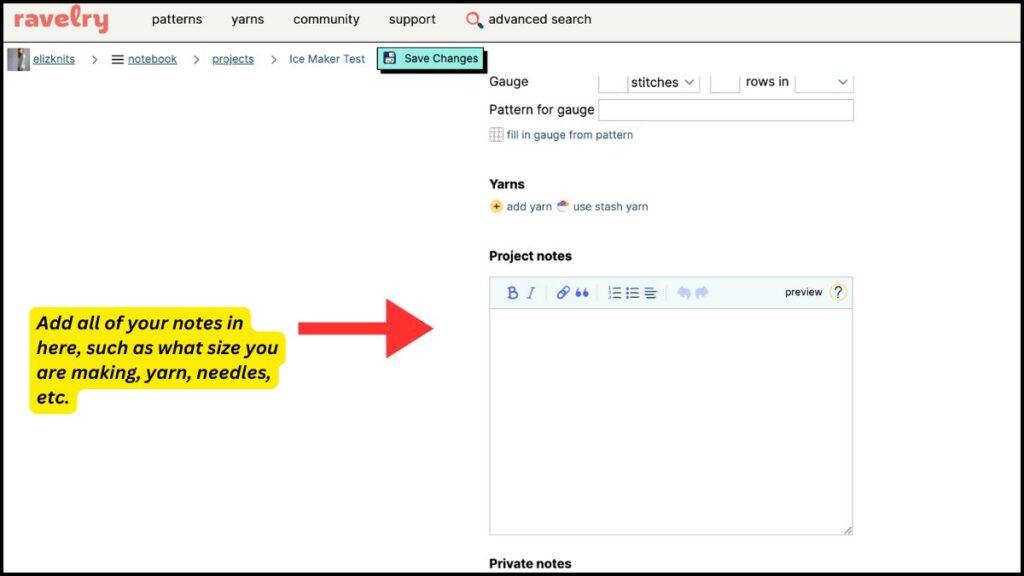
When you first start a test knit, you can either leave it blank until you’re done and ready to provide all of the finished details, or you can start to populate it from the very beginning and add to it as you go. The below photos will show you some of the most important areas you will want to populate.
The “Notes” section is where you will enter in all of your notes such as: what size you are making, the amount of ease, any pattern adjustments you made, etc.
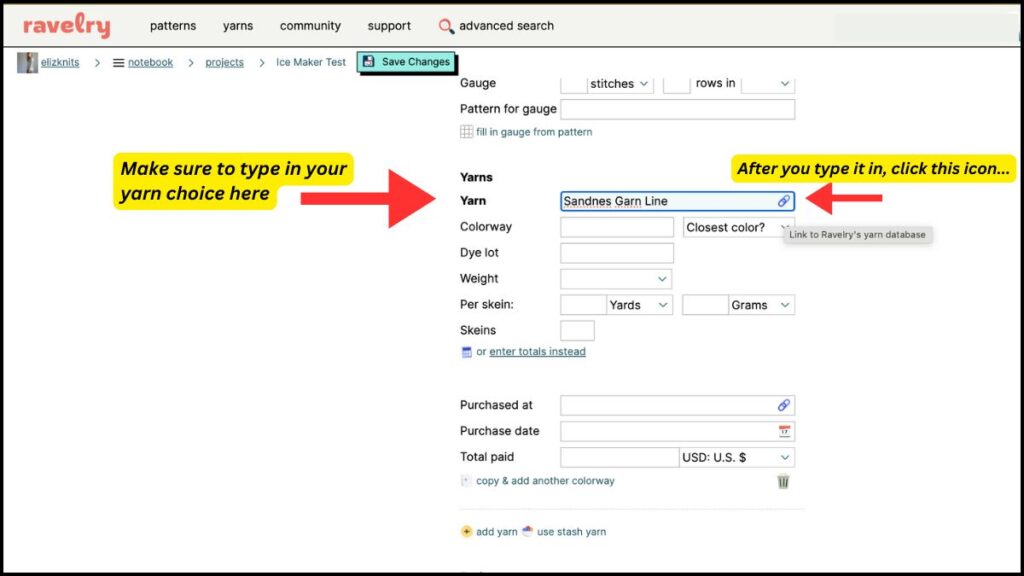
Make sure to add in the yarn you chose in the “Yarn” section. Here is how you populate that area – in the yarn field, type in your yarn, starting with the brand. So in the below example I typed in Sandnes Garn (the brand) Line (the yarn name). Then after you have typed that in, click the “link” icon that’s at the right end of that box:
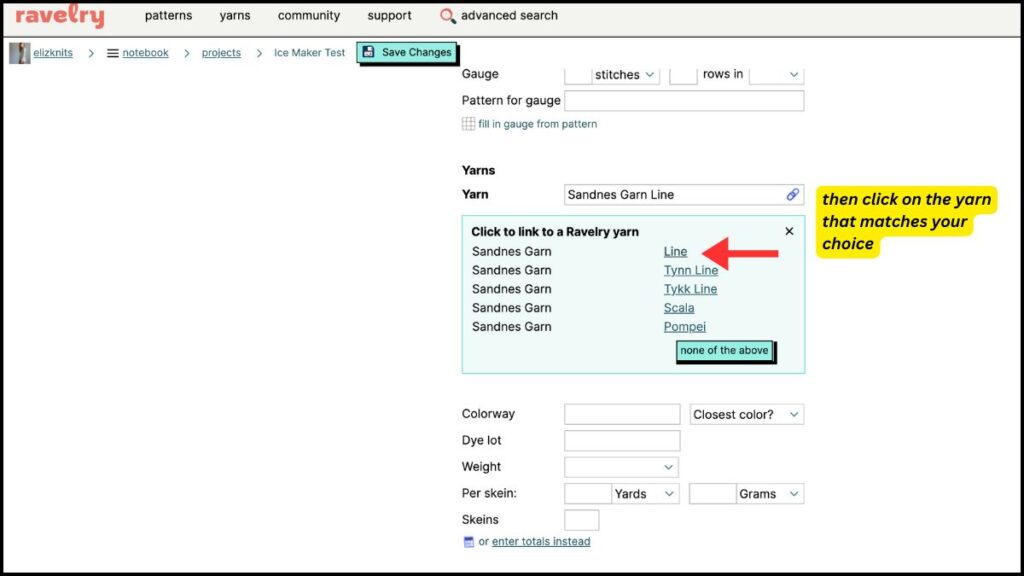
Upon clicking that icon, the system will show options for yarns in the database that match what you typed in. In this example, the very first yarn listed is the exact yarn I used so I will click on that yarn name in that box:
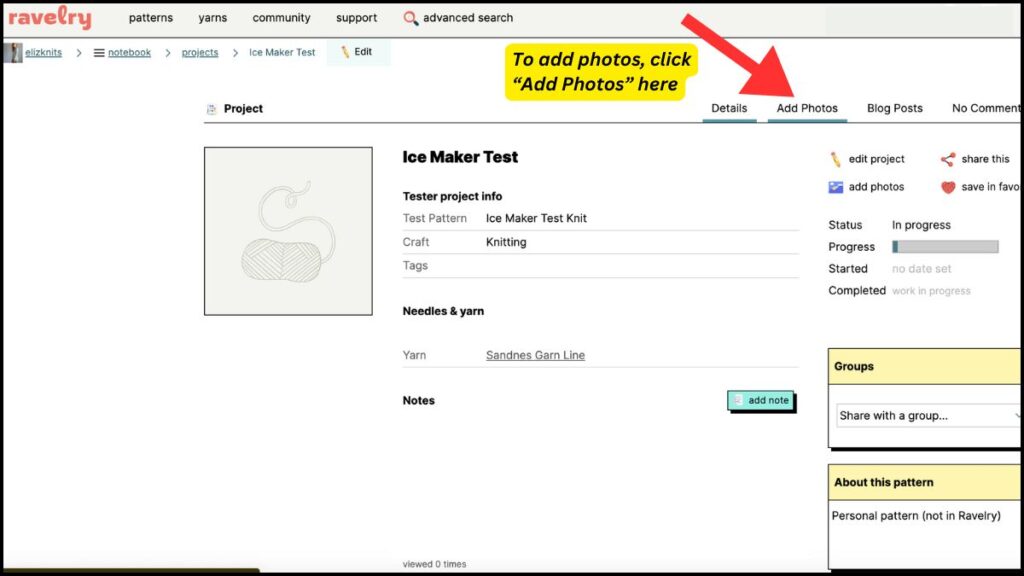
Once you have photos ready to add, that is the most important aspect of your project page. Here is how you add photos to your page – first, click on the “Add Photos” at the top.
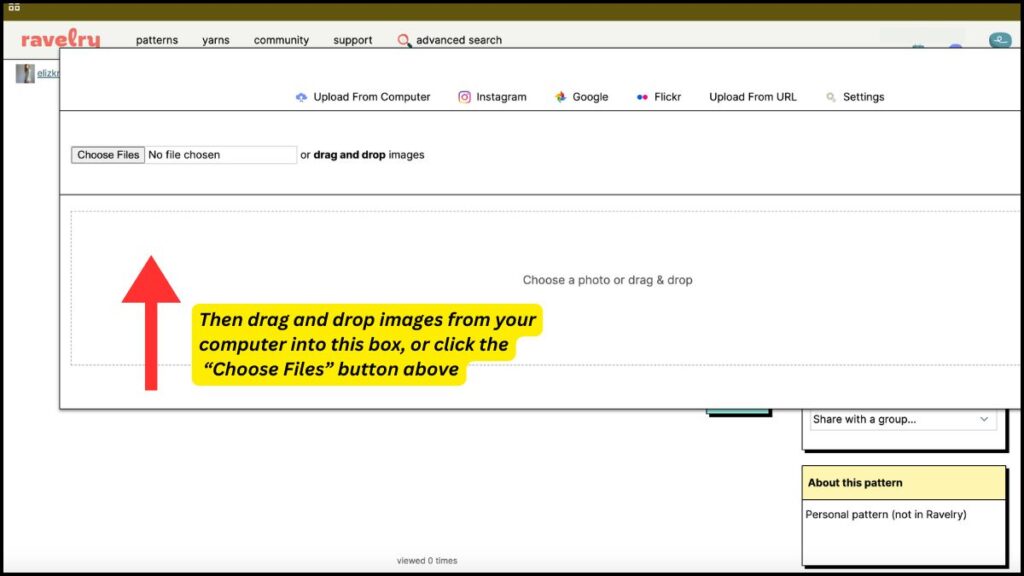
Then you’ll be prompted to either drag and drop photos from your computer into the box, or you can click on the “choose files” button above the box.
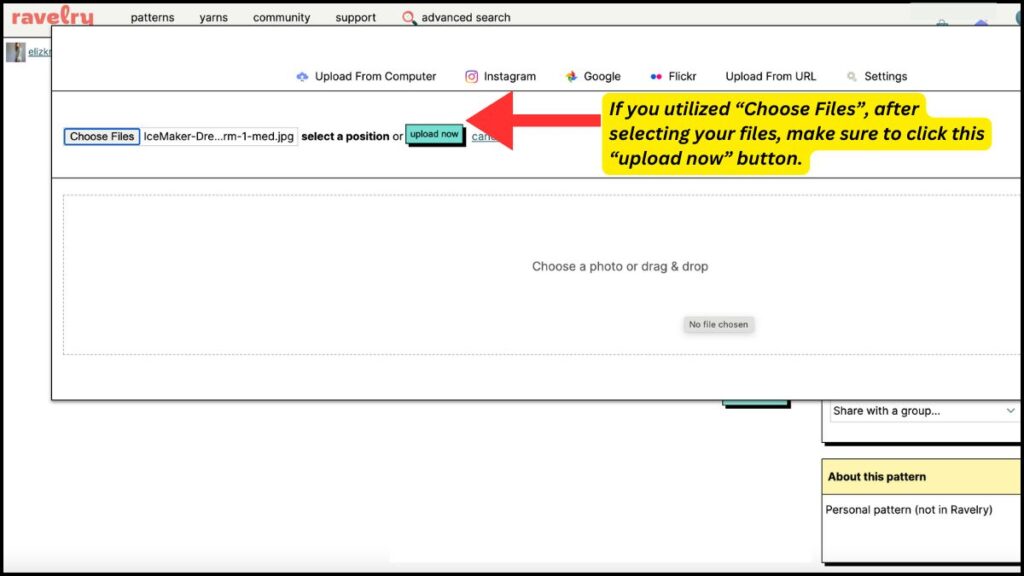
If you chose to upload them via the “choose files” button, after you select your photo(s), make sure to then click the “upload now” button:
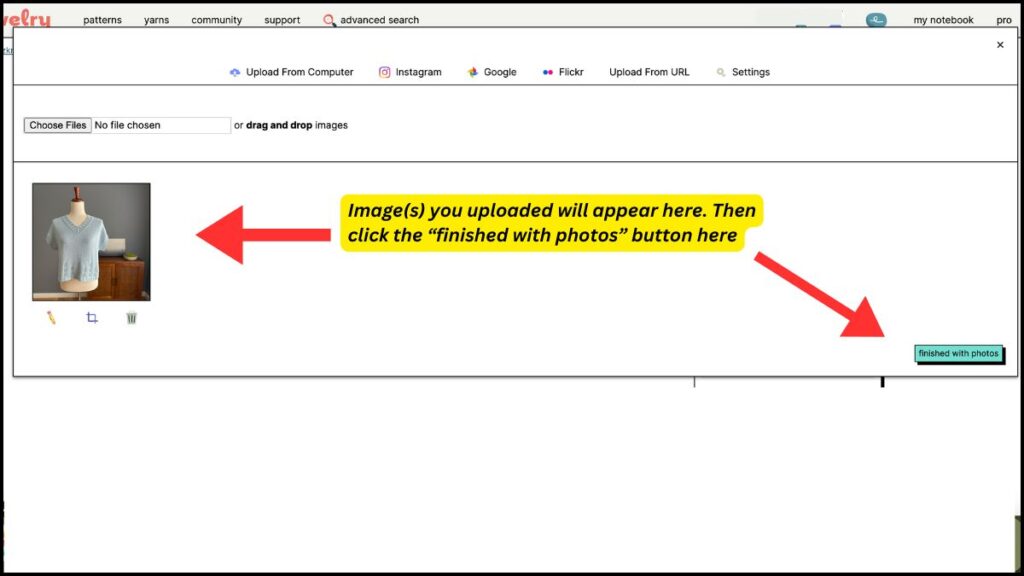
Once you’ve added your photos, you’ll see them as thumbnails in the box as shown below (FYI, if you uploaded the wrong image, you can click on the trashcan icon under the image and then try again.) Once you’re done uploading, you can click the “finished with photos” button.
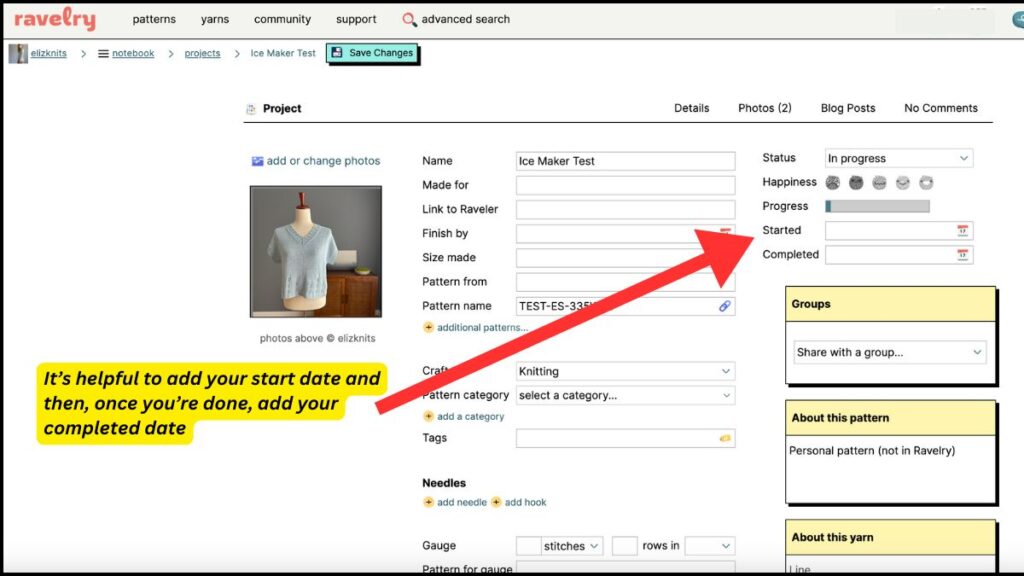
Another helpful thing to populate is the start date and end date of your test knitting process. So you can add your start date right away, and then add your end date once you’ve uploaded your final pictures at the end of the test knit.
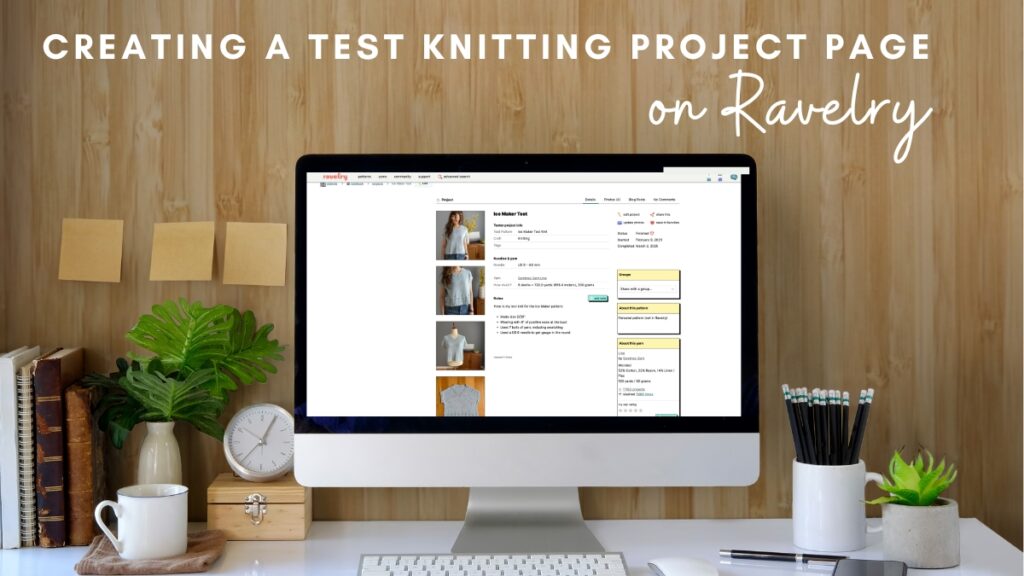
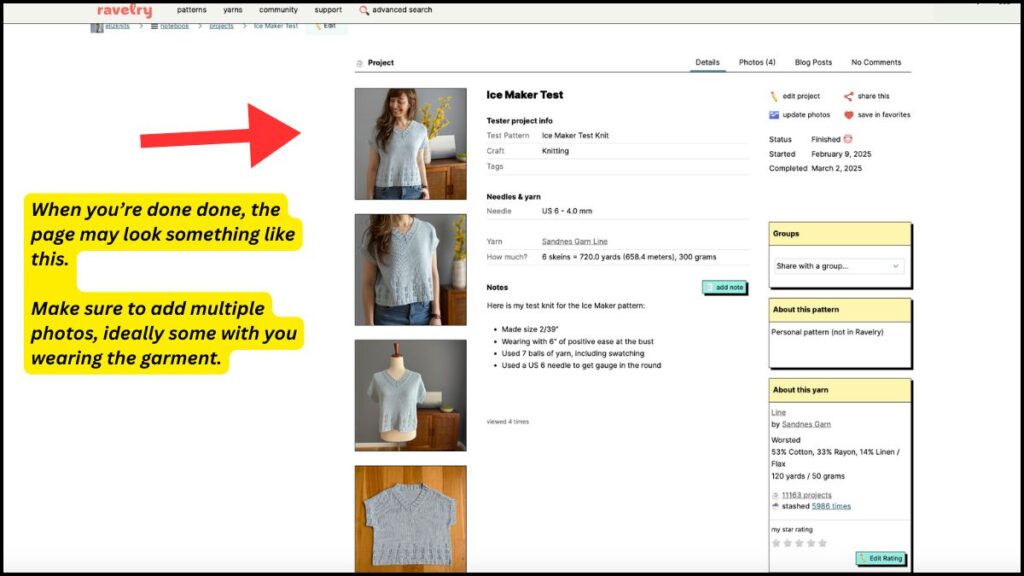
You can add more images, notes, etc. at any point to your project page. At the end of your test knit, before your test knitting deadline, your project page may look something like this!

