What is a Gauge Swatch?

A gauge swatch is very important in knitting, especially if you are making a garment. You can usually get away with skipping the swatching process if you are doing a scarf or cowl, but when it comes to sweaters or vests, your gauge can be the difference between a well-fitting garment and one that either doesn’t fit at all. Even being just half a stitch off can make a sweater unwearable for you in the end.
So what exactly is a gauge swatch?
It’s a small sample you knit up using the yarn you plan to use for your project and the needles you think you will need to use in order to obtain the gauge listed in the pattern. The gauge swatch will tell you if the needles you are using, for the particular yarn you chose, is giving you the gauge you need.
What you’ll need:
- A gauge ruler or tape measure
- Your selected yarn & needles
Choosing your yarn:
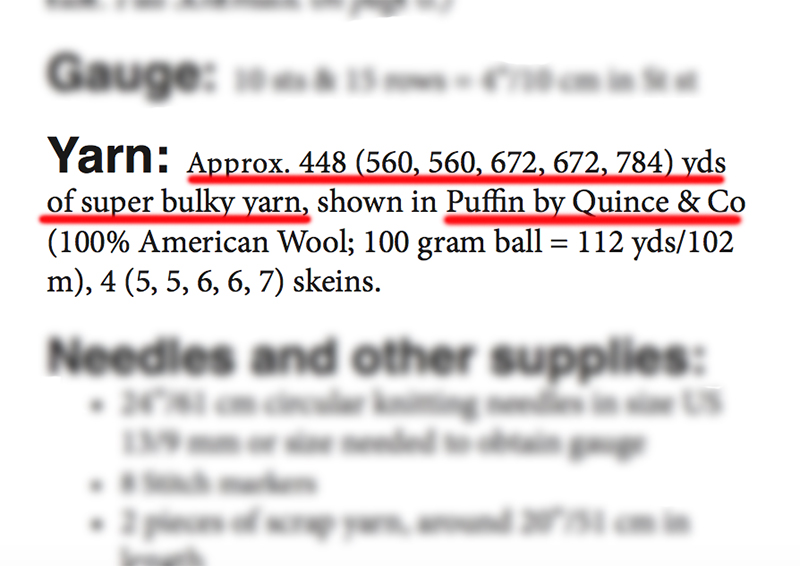
You’ll either choose the same yarn as that suggested in the pattern, or a good substitute that is similar in weight. For example, in all of my patterns I list the weight classification (such as dk, worsted, bulky, etc.) and then I also list the specific yarn I used, as shown in the screenshot below from my Abbi Shawl Collar Vest pattern.

Many designers, myself included, will “cushion” the yardage listed to include enough so that you can knit the gauge swatch and still have enough to knit the garment. However, especially if you plan on choosing a different type of yarn than that listed in the pattern, it can be a good idea to purchase an extra skein of yarn just to be on the safe side (I like to call it the ‘insurance’ skein!)
Choosing your Needle:
Now that you’ve chosen your yarn, it’s time to choose the needle size you will start with to do your swatch. I say start with because you may not get the exact gauge with your first needle. That’s the point of the swatch – to test out what needle size you personally need to use to get the gauge listed in the pattern. Remember that the needle size listed is just what the designer had to use to get the gauge listed – and because we’re all human and not machines, everyone’s tension can be a little different. I sometimes can be a tight knitter, and some knitters can be very loose. Neither is right or wrong! Here is what I recommend doing when deciding what needle size to try first:
- If you are using the same yarn as that listed in the pattern, try the needle size that is listed in the pattern
- If you are substituting with a different yarn (but that matches the yarn’s weight classification such as dk, worsted, bulky, etc.), look at the yarn’s label and see what needle size it recommends to get the gauge listed in the pattern.
Let’s swatch:
So you have your yarn and you have your needles. It’s time to cast-on for your gauge swatch. Ideally, you will want to create a swatch that is at a minimum 4″x4″. Because I like to have extra space around to measure, I recommend making it about 5″x5″. In our example where we are trying to get a gauge of 10 sts = 4″, I would cast-on 14 stitches. Your pattern will tell you what stitch pattern your gauge should be measured in. Most patterns use Stockinette stitch (knit on RS rows, purl on WS rows), but sometimes it may be a different stitch pattern. Work the stitch pattern for around 5″ and then bind-off.
Using the Abbi Shawl Collar Vest pattern as our example, I am looking for a gauge of 10 sts & 15 rws = 4″.
Time to Measure:
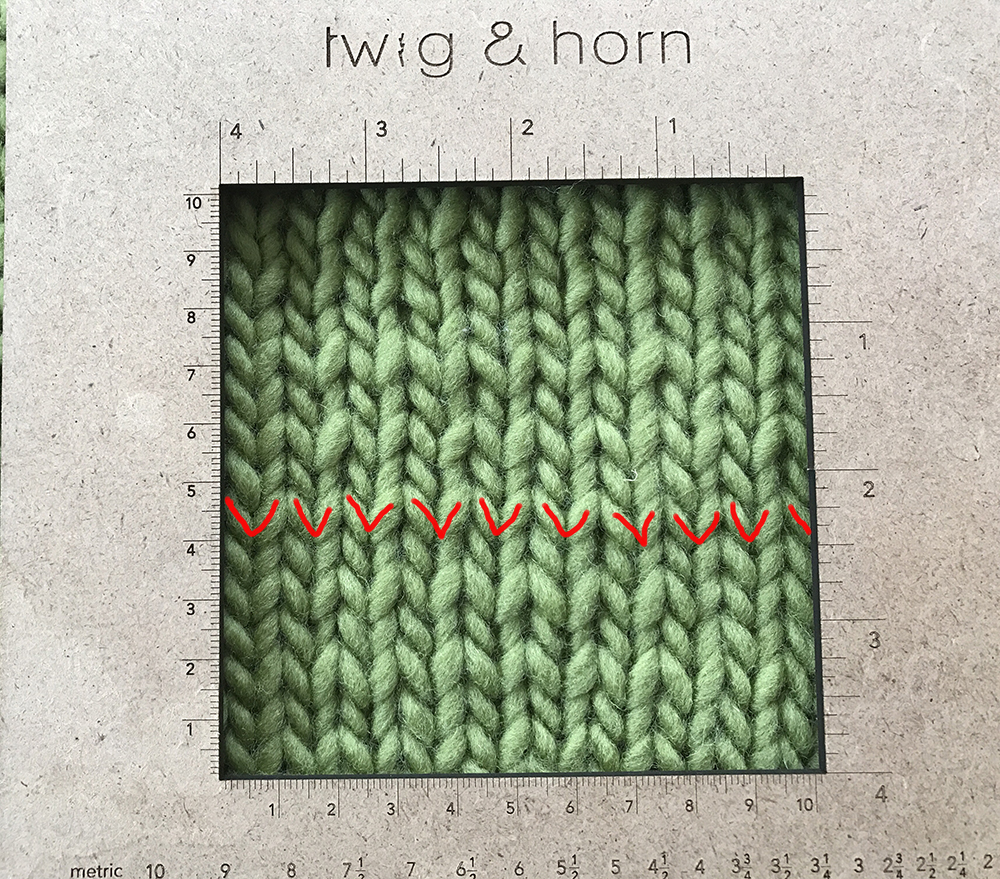
Now comes the moment of truth – are you on gauge or not? There are many different types of tools you can use to measure your gauge. In my example below I’ve used Twig & Horn’s gauge ruler but I often use a simple tape measure too – either will work. As you can see in the image below, to measure your stitch gauge you will line up the edge of your gauge ruler (or tape measure) to the edge of one of your stitches. Each stitch looks like the letter “v”. Count the number of “v’s” across the gauge ruler (or if using a tape measure, until you reach 4″). In the image below I have outlined the “v’s” in red. As in this example, your last “v” may be only partial:

I’ve counted 9.5 “v’s” over my 4″ width. So I am just shy of my desired 10 sts = 4″, meaning I am getting less stitches per inch than I want.
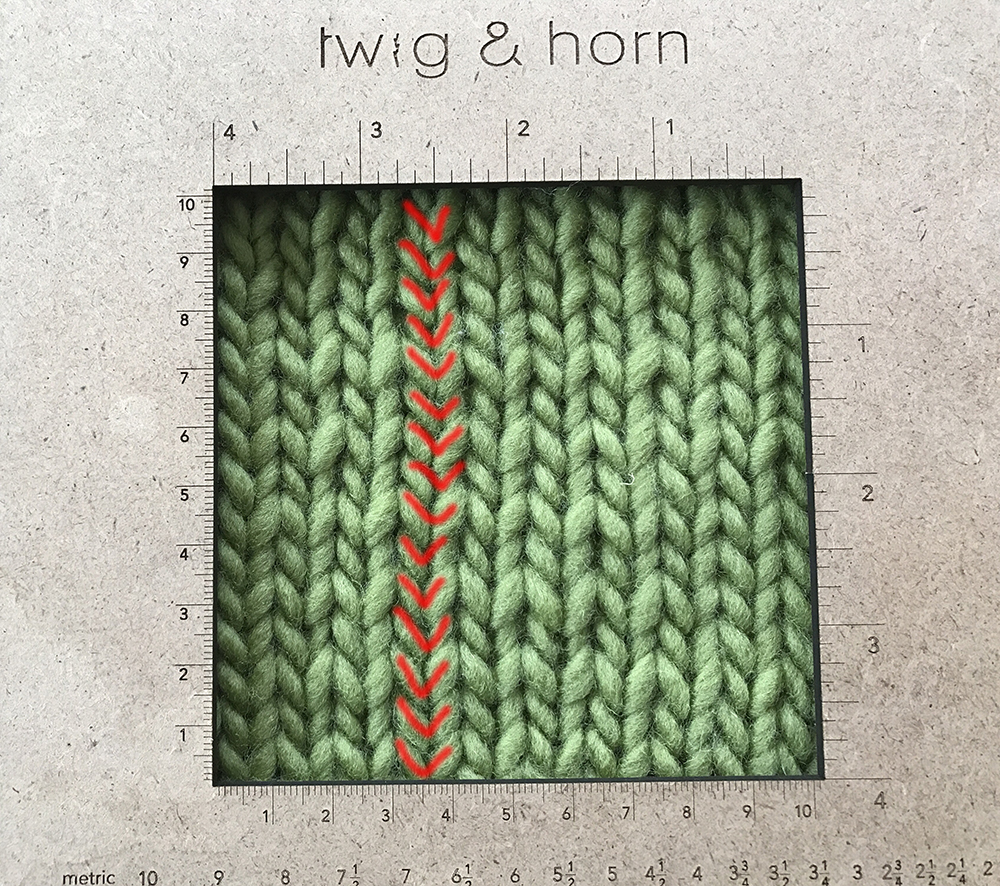
Now let’s check row gauge – For this, make sure your ruler is lined up at the bottom of a stitch – similar to stitch gauge, you’ll be looking for the “v’s”:

In this example, I count 13 “v’s”, so I am also getting less rows per inch than what my pattern calls for.
How to adjust:
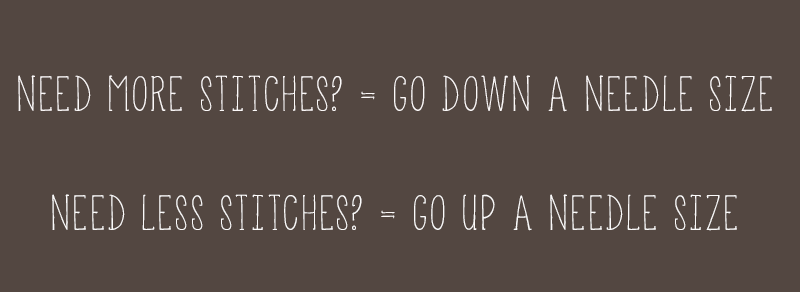
Both my stitch and row gauge has told me that I am not getting enough stitches/rows that I need. If you need more stitches/rows per inch (as I do in this example), that means you need a tighter gauge – and to get a tighter gauge you need to go down a needle size. If the opposite were true, say you needed less stitches/rows, that would mean you need less stitches per inch, so you would need a looser gauge – and to get a looser gauge you need to go up a needle size.

Those are the basics of gauge swatching! Below I have answered a few FAQ’s about the topic…
Swatching FAQ:
Should I wash my swatch?
Well this depends – do you plan on washing/blocking your garment? 99% of the time you will so in order to get the most accurate gauge swatch, you should soak and block your swatch. I know, I know – we all just want to get started on our new projects right away! But if you are knitting a garment where fit is important, then the more steps you take at the beginning to ensure you have the right gauge then the more likely you are to have a garment you will love wearing and that will look great on you. I do recommend measuring your swatch before and after blocking – this helps give you an idea of how much it grows during the blocking process.
Stitches vs Rows – which is more important?
First look at the stitch gauge – for most patterns, stitch gauge is the most important thing because it dictates how many stitches you cast on. If your row gauge is off a little, you can always compensate by working fewer or more rows as you knit. But with stitches, you have less flexibility. Of course, there are some patterns that you knit sideways where your row gauge is actually more important than your stitch gauge – in these scenarios however, a pattern will typically warn you that this is the case so that when you are swatching you are paying more attention to the rows.
What if I get gauge but I don’t like the look of the fabric?
This can sometimes happen when you try to substitute yarn. You’ve done multiple gauge swatches and finally got gauge with a particular needle size. But…you’re not sure if the fabric it creates is right for the pattern. Perhaps in order to get the right gauge you had to go down a few needle sizes than what the yarn label recommended and so you now have a very dense piece of fabric. Or perhaps the opposite happened and now your stitches are really loose and drapey. I often say that just as important as obtaining the right gauge is being happy with the kind of fabric that is created at that particular gauge. Sometimes the gauging process tells that the yarn you wanted to use with the particular pattern is just not a right fit. If you have already purchased all of the yarn required for the pattern, not to worry – all that means is that now you know what your optimal gauge is for the yarn and you can go on Ravelry and find a different pattern better suited for the yarn.
What do I do if my garment is knit in the round? Do I have to swatch in the round?
Check out my previous blog post on this top.
